Project Skeletool almost done..... (WARNING: Pic Heavy)
-
*Hey gang. Evil here again. If I had to name the one multitool project that I have been asked about the most, this would be the one. It has actually been at this stage for quite a while now. I delayed posting it because I wanted to post it when it was 100% complete. However, I realized that if I were to wait for that, then it would still be a while before I could share its progress with any of you. So, I decided to share this project with you all despite the fact that I am not quite done with it yet. When I first got my Skeletool, it was lust at first sight. As much as I liked the looks of the tool, it kept falling short for me to EDC it. For those who have followed my posts, you will know that not having scissors is a deal breaker for me, so that was how this whole project got started. Little by little, I started modding it more to suit my needs. I carry this with me everyday without fail and despite any added weight, I still don't even notice it is there...until it is needed. I still have a few mods in store for this project that I need to do before I can consider it done. I will post more photos in the future as I make more progress on the final mods. As stated before, my time for modding multitools is rather limited. In the meantime, I present to you Project Skeletool.....
~ evil ~[i]
WARNING: extremely pic heavy
[i]Full view of Project Skeletool.....*

Yet another view.....

Here is the quick release system that I came up with for my Skeletool. You hear and feel a click once the tool is locked in. If I stand, it swivels vertically. When I go to sit, it automatically swivels horizontally so it doesn't jab my leg, etc. The clip is "barbed" and won't come unclipped unless you physically do so and yet if I need my tool it only takes a split second to release it by pushing the button on the clip. To attest to how much I trust this setup, I accidentally flipped twice on my mountain bike and it stayed put with no issues whatsoever. It hangs the tool a little low, but the Skeletool is such beautiful, wicked looking tool and don't mind if it is on display.....

*
Close-up of the quick release stud.....*
 ____________________________________________________
Using the standard hole on the main blade was too close for comfort for me and actually sliced my fingertip trying to open the blade quickly, so I fabricated a teardrop shaped thumbstud that tapers towards the tip. It compliments and flows with the design of the blade and works beautifully.....

Close-up of teardrop shaped thumbstud.....
 ____________________________________________________
Here you can see the aluminum spacer I made for the second layer. I continued and extended the shape of the outer original layer and brought it to a tapered point.....
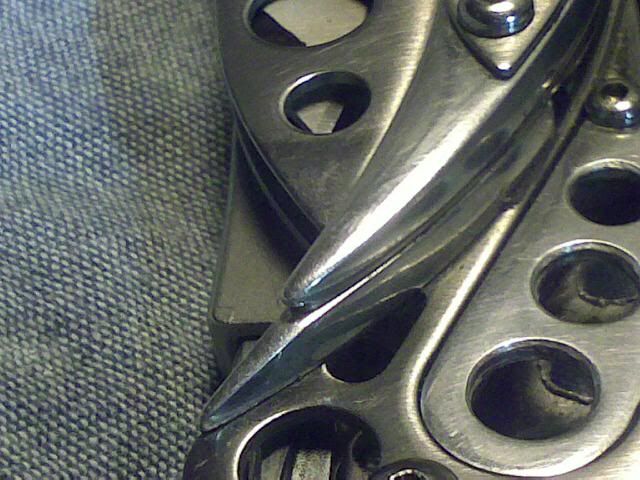
From this view you can better see how they meld together. You can also see in between them the stainless steel liner that separates the two layers. Without this layer, this part of the mod would have been impossible because the spare bit and the scissors would be pressing against one another and if you deployed the scissors, the spare bit would simply fall into the other layer.....

This is a temporary cover that I fabricated for the caribiner area. I have plans to perhaps put a ratchet or a LED light in this area when my time permits. Until then, I figured I might as well put something there to compliment the tool.....

Yet another view.....

*Here is a close-up of the scissors closed. Scissors and liner shaped to match the original scale. I pressed a nodule/bump onto the liner which holds the scissors in closed position, similar to the way the handles are held closed on a Leatherman Crunch. Also, I fabricated a new low profile pivot bolt washer to compensate for some of the added thickness.....

Here's a top view of the two layers while scissors are in closed position.....

Here is a view of the backside while the scissors are closed. Exposed is an extra deep nail nick to easily deploy the scissors.....
 *
*Here is the front side with the scissors closed. Retaining the spare driver bit was the whole focus of this particular mod. Either I added scissors and retained the spare driver bit, or I wouldn't have added the scissors at all. There are times I just want to grab my tool and have the bare necessities onboard without having to bring them along separately. Also, if you look closely at the thin stainless steel outer scale, you will see that I drilled out the aluminum scale underneath to match all of the holes. On a standard scale, you will see that these are blocked. Removing the extra material surely won't offset the weight that I've added to the tool, but it surely couldn't hurt either. Honestly, I wonder why they didn't do so to begin with. Maybe it was a little more added cost for them. Maybe I pay too much attention to details.....

Scissors partially deployed. I lifted out the second driver bit part of the way in this photo so you could see the liner between the layers.....

Fully deployed.....

And yet another view.....
 *
*Far too many times have I used the plier head of a multitool as a makeshift hammer, leaving them all ugly and dinged up. This my MUT-ish style of hammer/prybar I fabricated for my Skeletool. Because of the surface area of the hammer, its uses are limited but works very well and is easily capable of breaking glass (tested). As for the prybar, I could of easily notched the tip to pull nails, however, I find myself pulling nails next to never. If that ever becomes the case, I can easily add a notch. Seeing as I airbrush just about every day, I am forever opening up paint cans. This prybar hands down is the best opener I've used. You have a firm grip on the whole tool for leverage. In case you are wondering, I machined it out of a solid piece of chrome vanadium. While you can't readily see it in the photos, the hammer extends all the way up to the base of the caribiner cover I made and mates with the inner shape of the caribiner hook area, forming a very solid mount. Also, you'll see that the outer edges of the caribiner lay perfectly in the cutouts on the sides of the hammer. This transmits the downward force directly and evenly to the hammer head. If you relied solely on a bolt to transmit that force, you'd no doubt shear it in no time.....

Yet another view.....

Rear and bottom view of hammer/prybar.....
 *
Searching high and low, I couldn't readily find any fasteners to suit my needs, so I ended up fabricating some of my own for this project. They were inspired by my old school Gerber muliplier fasteners. I may change them in the future.....

Yet another.....

I was never fond of the laser etching that comes off ever so easily. Plus, I like my projects to be one of a kind. I redid the brushed finish and added my evil touch with some freehand engraving to compliment the evil and wicked looks of the Skeletool.....

*
Here you can see how light affects the engraving from a different angle.....*

-
You do us proud with your modding evil

I really like to the logo too >:D
-
I can't believe Leatherman haven't headhunted you already Evil.. :o 8)
Now add a 2HO blade and send it to me.. ;) -
Very professionally looking work you do Evil!
 I like the MUT-ish hammer feature the best

-
That contoured thumbstud is brilliantly executed

-
Don't know how I missed this thread earlier...
Simply unbelievable. Love the hammer.
That is an awesome execution of concept.
-
*Thank you all for the comments. Today I stopped in at REI looking at sheaths, not for my Skeletool but another multitool. My Skeletool was dangling off to my side as always. A man saw it and approached me and we got to talking about tools. He offered me a ridiculous amount of money for my Skeletool (enough to buy a few of them). In hindsight, maybe I was foolish not to take his offer, but then again, I may have regretted it forever. While I have been modding things my whole life, multitools were simply tools that I used on ocassion... never modded them. Project Skeletool is what got me into multitools and modding them to suit my needs, so more than anything, it is of sentimental value. Anyway, I didn't find any sheaths to my liking and will perhaps try my hand at making one in the future. I have upholstered cars and made custom stunt kites in the past, so we'll see..... ;)
~ evil ~*
-
@Tsquare said:
Hey evil what tools did you use to machine the new components for this skeletool?*Hey Tsquare. I don't use much more than anything that you'd find in a home workshop. Nothing high tech or fancy like a cnc machine or mill. All my mods are hand-made with basic, traditional tools. Drill press, grinders, sanders, various rotary tools. Detail work is done over a modified parts washer to keep the temperatures down. Really low-tech. After years of sending parts out for bead blasting, I finally got my own set-up the other day. I still need to make some sort of booth. If you've never bead/sandblasted, let me tell you, it'll make one hell of a mess of your work area.....
~ evil ~*


Hello! It looks like you're interested in this conversation, but you don't have an account yet.
Getting fed up of having to scroll through the same posts each visit? When you register for an account, you'll always come back to exactly where you were before, and choose to be notified of new replies (either via email, or push notification). You'll also be able to save bookmarks and upvote posts to show your appreciation to other community members.
With your input, this post could be even better 💗
Register Login


