
Skip to content
Collapse
? [[global:guest]]
Unread Recent
HOME SEARCH PROFILE MESSAGES 0 BOOKMARKS MEMBERS BADGES
Multitool.Org Forum
MultiTool.org • Community Header Space • Watch This Space

Kosmo's Projects

Scheduled Pinned Locked Moved The Mod Squad
36 Posts 1 Posters 4.6k Views
  1. Home
  2. Tool Talk
  3. The Mod Squad
  4. Kosmo's Projects
Kosmo's Projects
  • Oldest to Newest
  • Newest to Oldest
  • Most Votes
Reply
  • Reply as topic
Log in to reply
This topic has been deleted. Only users with topic management privileges can see it.
  • Syph007 Offline
    Syph007
    Global Moderators
    Posts: 9,842
    Syph007 Offline
    Syph007
    Global Moderators
    wrote on last edited by
    #2 Quote Reply

      If you are intending to assemble in the order as you have laid out, keep in mind the opener layer being on the backscale would render the can opener unable to opener cans. :D

      1 Reply Last reply
      • kosmo Offline
        kosmo
        Posts: 1,199
        kosmo Offline
        kosmo
        wrote on last edited by
        #3 Quote Reply

          @Syph007 said:
          If you are intending to assemble in the order as you have laid out, keep in mind the opener layer being on the backscale would render the can opener unable to opener cans. :D

          I realized it after I posted the picture. I think if I swap the position of the scales in the photo, it's correct.

          1 Reply Last reply
          • kosmo Offline
            kosmo
            Posts: 1,199
            kosmo Offline
            kosmo
            wrote on last edited by kosmo
            #4 Quote Reply

              I only have one spare phillips screw driver right now. I'm thinking one of the following compact variations.

              a) Grand Prix Compact
              b) Fisherman Compact
              c) Fieldmaster Compact

              1 Reply Last reply
              • hiraethus Offline
                hiraethus
                Admin Team
                Posts: 6,969
                hiraethus Offline
                hiraethus
                Admin Team
                wrote on last edited by
                #5 Quote Reply

                  Grand Prix, definitely. If you were sticking with the corkscrew, olive fork fishscaler for the ultimate gourmand's knife.

                  1 Reply Last reply
                  • kosmo Offline
                    kosmo
                    Posts: 1,199
                    kosmo Offline
                    kosmo
                    wrote on last edited by
                    #6 Quote Reply

                      @hiraethus said:
                      Grand Prix, definitely. If you were sticking with the corkscrew, olive fork fishscaler for the ultimate gourmand's knife.

                      The Grand Prix is what I'm thinking too.

                      1 Reply Last reply
                      • pfrsantos Offline
                        pfrsantos
                        Posts: 24,165
                        pfrsantos Offline
                        pfrsantos
                        wrote on last edited by
                        #7 Quote Reply

                          @kosmo said:

                          @hiraethus said:

                          Grand Prix, definitely. If you were sticking with the corkscrew, olive fork fishscaler for the ultimate gourmand's knife.

                          The Grand Prix is what I'm thinking too.

                          In terms of complementing tools, that's the best option.

                          :salute: :tu:

                          1 Reply Last reply
                          • kosmo Offline
                            kosmo
                            Posts: 1,199
                            kosmo Offline
                            kosmo
                            wrote on last edited by
                            #8 Quote Reply

                              Testing the assembly (with no spring tension) and seeing what I can do to make fixtures to help in assembly. Also wanting to see if my shim washers are going to work and look at the layout of the blades closed. It looks like there is just room enough to get my fingernail in to open the second main blade in the back. I don't think a nail file or a small pen blade would be directly accessible between the two large blades. But since the Electrician's blade is wider it is accessible.

                              1 Reply Last reply
                              • kosmo Offline
                                kosmo
                                Posts: 1,199
                                kosmo Offline
                                kosmo
                                wrote on last edited by
                                #9 Quote Reply

                                  After all the experimenting to attempting to pre-form rivets (</topic/59485) I decided to use the leather protector method. Using relatively thin layer of leather with round holes punched in it to peen through. I turned the knife over many times to try to get equal peening on both sides of the rods for riveting. I think with a little practice, I'll get better at this.

                                  1 Reply Last reply
                                  • SAK Guy Offline
                                    SAK Guy
                                    Posts: 23,929
                                    SAK Guy Offline
                                    SAK Guy
                                    wrote on last edited by
                                    #10 Quote Reply

                                      Looks great!! You did a good job!!!!

                                      1 Reply Last reply
                                      • kosmo Offline
                                        kosmo
                                        Posts: 1,199
                                        kosmo Offline
                                        kosmo
                                        wrote on last edited by
                                        #11 Quote Reply

                                          :cheers:

                                          1 Reply Last reply
                                          • Syph007 Offline
                                            Syph007
                                            Global Moderators
                                            Posts: 9,842
                                            Syph007 Offline
                                            Syph007
                                            Global Moderators
                                            wrote on last edited by
                                            #12 Quote Reply

                                              Ah you got your lotz-a-bladez model finished. :tu:

                                              I can peen the cellidors together fine, but the alox are so delicate I just dont have the patience for it.

                                              1 Reply Last reply
                                              • kosmo Offline
                                                kosmo
                                                Posts: 1,199
                                                kosmo Offline
                                                kosmo
                                                wrote on last edited by kosmo
                                                #13 Quote Reply

                                                  @Syph007 said:
                                                  Ah you got your lotz-a-bladez model finished. :tu:

                                                  I can peen the cellidors together fine, but the alox are so delicate I just dont have the patience for it.

                                                  I was originally thinking of a three layer, all blades, but I'm pretty happy with this. I'm missing the blunt point, youth blade (aka butter blade) from the "My First Victorinox." But kept the opener layer instead. The three layer Alox Cadet is a nice size.

                                                  It took a lot of time. One thing I Iearned is that the material underneath the peening makes a difference. I used leather between the back of the knife and the mini anvil I am using. The leather would often prevent contact of the back of the rod to the hard surface of the anvil with varying results. The rivets appear to be slightly larger on the front of the knife than on the rear.

                                                  If I decide to try pivot screws in the future, this knife will be a candidate.

                                                  1 Reply Last reply
                                                  • kosmo Offline
                                                    kosmo
                                                    Posts: 1,199
                                                    kosmo Offline
                                                    kosmo
                                                    wrote on last edited by
                                                    #14 Quote Reply

                                                      Thickness comparison. The 3 layer Alox Cadet is only slightly thicker than a 1 layer Cellidor (Bantam) and noticeably thinner than a 2 layer Cellidor (Recruit). It is also about the same as a 2 layer Pioneer (or Soldier).

                                                      1 Reply Last reply
                                                      • Huntsman Offline
                                                        Huntsman
                                                        Global Moderators
                                                        Posts: 5,781
                                                        Huntsman Offline
                                                        Huntsman
                                                        Global Moderators
                                                        wrote on last edited by
                                                        #15 Quote Reply

                                                          @kosmo said:
                                                          I was originally thinking of a three layer, all blades, but I'm pretty happy with this. I'm missing the blunt point, youth blade (aka butter blade) from the "My First Victorinox." But kept the opener layer instead. The three layer Alox Cadet is a nice size.

                                                          Hey Kosmo - Great post - Thanks

                                                          I love these 'real-time' posts, where members keep us informed as the job progresses (looking at you too Syph)
                                                          Very brave too :D - as it could all go horribly wrong!!

                                                          But I gotta ask the obvious question - 'Why on earth would you want four blades on a SAK ?' ?? ???
                                                          Is there a use for it - or is it just a mod project?

                                                          1 Reply Last reply
                                                          • kosmo Offline
                                                            kosmo
                                                            Posts: 1,199
                                                            kosmo Offline
                                                            kosmo
                                                            wrote on last edited by kosmo
                                                            #16 Quote Reply

                                                              I was pretty sure this was going to work out. I just wasn't sure now nice or ugly a job of peening I was going to do.

                                                              I didn't want to spend the money of tearing down yet another Cadet Alox for parts (I needed a second liner and washer), so I decided to go with aluminum liners from Cellidor tear downs and made my own washers from brass (kind of a pain). It would have been a quicker and easier to buy a punch and die set. But I didn't want to spend another $30 or $40 dollars on the tools yet, unless I am going to do more in the future. I've got the original Cadet Alox liner and washer saved. If I decide to build another 3 layer I will have enough for it now. Not sure how many three layers I will build in the future. Maybe one with scissors, when I can find the scissors. Maybe one with a saw blade.

                                                              Different blades for different purposes and personal preference. I tend to use smaller blades and wanted to use the Electrician's blade out of a knife I've used since the 90's. I thought about including the nail file instead of the small pen blade, but I often want to use a small pen blade for certain purposes. I like the serrated blade more for food prep, cutting bread or pealing oranges for example. I may build a multi-blade knife in the future with a saw blade, but I don't have much use for saw blade in reality. I also like the handling of a three layer Cadet more than a two layer Cadet.

                                                              1 Reply Last reply
                                                              • Syph007 Offline
                                                                Syph007
                                                                Global Moderators
                                                                Posts: 9,842
                                                                Syph007 Offline
                                                                Syph007
                                                                Global Moderators
                                                                wrote on last edited by Syph007
                                                                #17 Quote Reply

                                                                  Since you're experimenting with peening more than I did, here are some thing for you to try.

                                                                  Use a carriage bolt as the backing. Put it in a bench vice as a test.
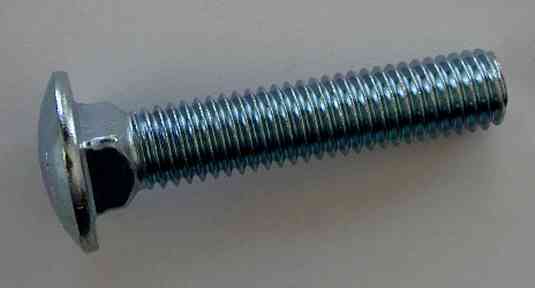
                                                                  This way each side of the rivet is getting hit by a domed surface. When I was playing I found it gave pretty nice results with lots of light hits.

                                                                  If you find you'd like to hit the heads more to form them better but don't want the sak any tighter, put a shim stock or razor blade in during assembly. Then peen to your hearts content and pull the shim when done. Its best to cut rectangle with a V notch and push it in so the shim surrounds the pin as much as possible. Also coat it with oil.

                                                                  :tu:

                                                                  1 Reply Last reply
                                                                  • kosmo Offline
                                                                    kosmo
                                                                    Posts: 1,199
                                                                    kosmo Offline
                                                                    kosmo
                                                                    wrote on last edited by
                                                                    #18 Quote Reply

                                                                      @Syph007 said:
                                                                      Since you're experimenting with peening more than I did, here are some thing for you to try.

                                                                      Use a carriage bolt as the backing. Put it in a bench vice as a test.

                                                                      This way each side of the rivet is getting hit by a domed surface. When I was playing I found it gave pretty nice results with lots of light hits.

                                                                      If you find you'd like to hit the heads more to form them better but don't want the sak any tighter, put a shim stock or razor blade in during assembly. Then peen to your hearts content and pull the shim when done. Its best to cut rectangle with a V notch and push it in so the shim surrounds the pin as much as possible. Also coat it with oil.

                                                                      :tu:

                                                                      I am having an issue with the blades not being tight. I think it has to do with the middle pin being TOO tight. The back springs are slightly thinner than the blade and tool tangs. Too tight on the middle and it is causing a slight bow in the scales causing only a small surface contact at the end points. I may have to revisit this.

                                                                      This morning, I've already replaced the middle pin by pushing it out with a new pin. This will at least remove pressure on the middle for now. I may employ your shim idea here. I'm thinking of working on the two outer pins first to get better tightness on the blade tangs.

                                                                      1 Reply Last reply
                                                                      • Syph007 Offline
                                                                        Syph007
                                                                        Global Moderators
                                                                        Posts: 9,842
                                                                        Syph007 Offline
                                                                        Syph007
                                                                        Global Moderators
                                                                        wrote on last edited by
                                                                        #19 Quote Reply

                                                                          @kosmo said:

                                                                          @Syph007 said:

                                                                          Since you're experimenting with peening more than I did, here are some thing for you to try.

                                                                          Use a carriage bolt as the backing. Put it in a bench vice as a test.

                                                                          This way each side of the rivet is getting hit by a domed surface. When I was playing I found it gave pretty nice results with lots of light hits.

                                                                          If you find you'd like to hit the heads more to form them better but don't want the sak any tighter, put a shim stock or razor blade in during assembly. Then peen to your hearts content and pull the shim when done. Its best to cut rectangle with a V notch and push it in so the shim surrounds the pin as much as possible. Also coat it with oil.

                                                                          :tu:

                                                                          I am having an issue with the blades not being tight. I think it has to do with the middle pin being TOO tight. The back springs are slightly thinner than the blade and tool tangs. Too tight on the middle and it is causing a slight bow in the scales causing only a small surface contact at the end points. I may have to revisit this.

                                                                          This morning, I've already replaced the middle pin by pushing it out with a new pin. This will at least remove pressure on the middle for now. I may employ your shim idea here. I'm thinking of working on the two outer pins first to get better tightness on the blade tangs.

                                                                          I have the same issues when I assemble cellidor SAKs, if either of the inner pins are too tight it messes things up. I found it best to peen the end ones first and leave the inner ones until Im happy with the fit and action, then finish the inner pins.

                                                                          1 Reply Last reply
                                                                          • kosmo Offline
                                                                            kosmo
                                                                            Posts: 1,199
                                                                            kosmo Offline
                                                                            kosmo
                                                                            wrote on last edited by
                                                                            #20 Quote Reply

                                                                              @Syph007 said:

                                                                              @kosmo said:

                                                                              @Syph007 said:

                                                                              Since you're experimenting with peening more than I did, here are some thing for you to try.

                                                                              Use a carriage bolt as the backing. Put it in a bench vice as a test.

                                                                              This way each side of the rivet is getting hit by a domed surface. When I was playing I found it gave pretty nice results with lots of light hits.

                                                                              If you find you'd like to hit the heads more to form them better but don't want the sak any tighter, put a shim stock or razor blade in during assembly. Then peen to your hearts content and pull the shim when done. Its best to cut rectangle with a V notch and push it in so the shim surrounds the pin as much as possible. Also coat it with oil.

                                                                              :tu:

                                                                              I am having an issue with the blades not being tight. I think it has to do with the middle pin being TOO tight. The back springs are slightly thinner than the blade and tool tangs. Too tight on the middle and it is causing a slight bow in the scales causing only a small surface contact at the end points. I may have to revisit this.

                                                                              This morning, I've already replaced the middle pin by pushing it out with a new pin. This will at least remove pressure on the middle for now. I may employ your shim idea here. I'm thinking of working on the two outer pins first to get better tightness on the blade tangs.

                                                                              I have the same issues when I assemble cellidor SAKs, if either of the inner pins are too tight it messes things up. I found it best to peen the end ones first and leave the inner ones until Im happy with the fit and action, then finish the inner pins.

                                                                              I think that is what I'll try next. I'll work on the outer pins and then use my calipers to keep measuring the thickness of the scales in the middle, so not to over tighten.

                                                                              1 Reply Last reply
                                                                              • kosmo Offline
                                                                                kosmo
                                                                                Posts: 1,199
                                                                                kosmo Offline
                                                                                kosmo
                                                                                wrote on last edited by kosmo
                                                                                #21 Quote Reply

                                                                                  @Syph007 said:
                                                                                  Since you're experimenting with peening more than I did, here are some thing for you to try.

                                                                                  Use a carriage bolt as the backing. Put it in a bench vice as a test.

                                                                                  This way each side of the rivet is getting hit by a domed surface. When I was playing I found it gave pretty nice results with lots of light hits.

                                                                                  If you find you'd like to hit the heads more to form them better but don't want the sak any tighter, put a shim stock or razor blade in during assembly. Then peen to your hearts content and pull the shim when done. Its best to cut rectangle with a V notch and push it in so the shim surrounds the pin as much as possible. Also coat it with oil.

                                                                                  :tu:

                                                                                  I got this watchmaker's (peening) hammer from Harbor Freight (a source of cheap tools here in the US). I found nicer polished ones on-line, but at $4.99 it was about 1/4th the cost of ordering something similar on-line with shipping.

                                                                                  I estimated the head weighs about 2 1/4 oz while the entire hammer weighs ~3 oz. (Not sure how these measurements compare to others, head vs entire hammer?) It comes with two rounded steel tips. I'm going to see if I can get a bolt (probably metric) to mount the second round tip on a platform below the knife being worked on and hammer from the top.

                                                                                  Fastly error: unknown domain 151.101.1.124

                                                                                  favicon

                                                                                  (www.harborfreight.com)

                                                                                  watchmaker-hammer.jpg

                                                                                  1 Reply Last reply

                                                                                  Hello! It looks like you're interested in this conversation, but you don't have an account yet.

                                                                                  Getting fed up of having to scroll through the same posts each visit? When you register for an account, you'll always come back to exactly where you were before, and choose to be notified of new replies (either via email, or push notification). You'll also be able to save bookmarks and upvote posts to show your appreciation to other community members.

                                                                                  With your input, this post could be even better 💗

                                                                                  Register Login


                                                                                  • 1
                                                                                  • 2
                                                                                  1. Home
                                                                                  2. Tool Talk
                                                                                  3. The Mod Squad
                                                                                  4. Kosmo's Projects
                                                                                  Reply
                                                                                  • Reply as topic
                                                                                  Log in to reply
                                                                                  COMMUNITY LINKS
                                                                                  EDC-TV SAKWiki GearFeed SAKSelector
                                                                                  Operational Funds

                                                                                  Help us keep the Unworkable working!

                                                                                  Make A Donation
                                                                                  November Goal: $300.00
                                                                                  Due Date: Nov 30
                                                                                  Total Receipts: $0.00
                                                                                  Below Goal: $300.00
                                                                                  0% funded
                                                                                  • Login

                                                                                  • Don't have an account? Register

                                                                                  • Login or register to search.
                                                                                  • First post
                                                                                    Last post
                                                                                  0


