Evil's STYLE EV1..... (Pic Overload)
-
*Hey there, gang. It's been another crazy busy summer, so, I haven't been able to come around all too much. This is a project of mine that had gotten, not only neglected, but totally forgotten about for five years. When I recently found it again, parts were missing in action, giving no choice but to make custom parts for it. You can read up on the original post here. I have been asked about this project numerous times over the years and decided to come full circle and finally complete it. I've been putting it through the paces for about the past month and it has earned my stamp of approval. I am now using it more than I initially thought I would and has now become a functional part of my EDC. Created in typical Evil fashion... Evil's STYLE EV1.....
~ evil ~*

Back when I first started this project. I made a custom combo edged blade for it with a somewhat plain thumbstud. At that point in time, I didn't mind having a combo edge. With one of my more recent projects, Evil's Little Sin, I created a profile and grind that truly suits my small blade EDC needs perfectly. So, I set out to create a new blade that reflects those similar qualities for this project. The new blade has a blended, partial flat grind that some may refer to as a Scandi or scandinavian grind. It has very little belly and it is a very nice slicer while still doing well with puncturing. Crafted out of S90V leftover from my little sin project. I truly believe heat treating is an art and is the only processes that I outsource to someone that truly knows their craft. This time around, a more custom thumbstud. I kept the general shape as well as theme with holes to compliment the the tool. Wickedly sharp. or course. Length increased to a full 2" versus 1.6" stock. Quite a bit of work for such a small blade, but, in the end it was well worth it.....


The awl. Awls have become a necessity for me. This new awl is an exact duplicate of my previous awl, only this time around I created it out of D2 toolsteel to match the new large flat driver. It discreetly resides behind the main blade until it is called into action. Larger than the awl found on the ST300/Surge, it is more than capable to handle hand drilling tasks.....


When I first added the wire strippers to my Micra project, I didn't realize actually how much I would put them into actual use. Truth be told, I use them heavily and unless I will be dealing with heavy gauge wire, I will reach for them first before a dedicated set of wire strippers. That said, it was a no brainer for me to do the same to this project to add to the functionality. As with my Micra project, this modification does not affect the use of the scissors. The notches are cut in the area close to the pivot where the blades overlap during normal use.....


One of the tools that I always wanted to add to this project in order for it to serve practical use in my EDC was a large flat driver. That need has not changed over the years so that is what I set out to do. Crafted from D2 toolsteel. I decided to match the size of the large flat driver that I have found most useful for me, which is the one found in the wave. Nailnick was created towards the pivot for symmetry of the scale in relation to the nailnick for the file. That said, I am sure that some of you will be wondering about the ease of deployment because of the leverage, or lack thereof because of the position of the nailnick. I know this is an issue with a few of the tools out there. I am here to tell you that all of that is adjustable. The shape of the tang controls all aspects of deployment. From the pressure needed to deploy, to the amount of pressure, or snap, you feel when deployed and all other aspects in between. I started off with a gradual lobe with a smaller than normal radius which then ramps outwards to a more acute lobe with a larger radius. I know it sounds technical. In easy terms... it deploys with minimal effort, pressure increases as it opens more and then firmly snaps into place with authority. Last photo in this section is the Wave driver comparison.....


Tweezers. Some don't find much need for them. I am on the flip side of that. I get splinters... often. More often than not, they are metal. So, a decent set of tweezers were in order. Let me start off by saying that I wasn't very fond of the original set nor the way they were incorporated into the tool. They were a bit finicky to get at, for me anyway. I wanted to incorporate my new tweezers in such a way that they would not detract from the esthetics of the rest of the tool and yet still be easily accessible and deployable. The result. Tweezers that pretty much disappear into the tool until you need them, yet easily deployable with one fingertip. The small, but extra deep nailnick was bent at an angle to match the new scale. At the business end the faces have been lapped and honed to mate perfectly to get the most tiny of splinters. More accurate than my Silver Grippers.....


It's no secret that I've promoted the use of the under appreciated awl all of these years. This leads me to talk about another very under appreciated tool, in my opinion. I've been working with metal for a long time. One of the tools that I use all of the time without fail is a scribe. When I work with plastics, woods or even unhardened metals, an awl can typically serve the purpose for a scribe. However, with many of the other metals that I work with, nothing will even phase nor scratch them, well, nothing short of carbide or diamond. I have been making my own carbide scribes for years, but they have always been standalone tools. I've incorporated carbide glass breakers into quite a few tools over the years, but not an actual purpose built scribe. Stop pin and all hardware are hardened stainless steel. 6061 aluminum for the scribe body. Phosphor bronze bushings. At the business end, tungsten carbide, tapered primary grind, 40 degree secondary grind. Angled downwards, which aids in not having to hold it so perpendicular to scribe well. With the tool outstretched, it actually fits in my hand quite well and naturally. In the closed position you can see how the shape flows with the rest of the tool. I merely utilized wasted space on the tool. Easily deployable via the external tab. I've been putting it through the paces and has passed with flying colors. I can already tell that I will be using it heavily, especially since I am always seemingly misplacing my scribes. The ability to personalize metal objects and score glass to is an added bonus to always having a scribe with me.....
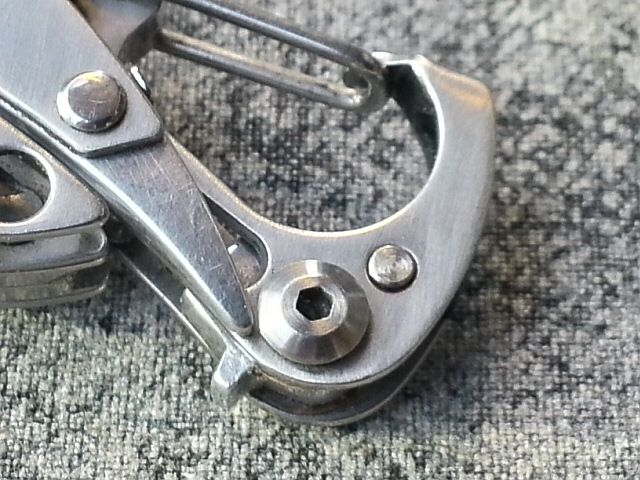
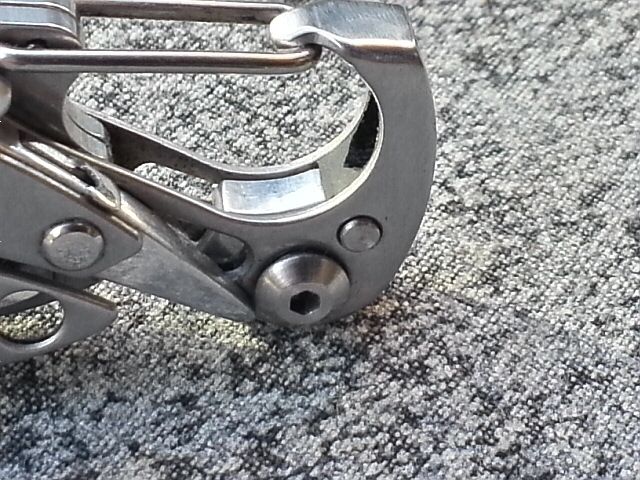


Let's talk about the factory spring for a moment. For me personally, it just didn't make the grade. First off, it was grossly under pressured. Secondly, they added a protrusion which aided in a quick release, however, it also made it easier to come undone if attachments were twisted just right. You add that to the already low pressure of the spring, it was just not something I found trustworthy or reliable. Also, with the original spring, I found that I was not even able to clip on to any of the round stock mini carabiners that I have because of clearance issues, nor many other keychain type items either. Of course this had to change. New spring that I made is thicker and at least double the strength. You have to actually make an effort and try to release it. Done away with is the protrusion. New spring is streamlined so nothing is able to catch on it as with with the original. Also, the swinging radius was reduced to fit most things universally. I can actually trust it now.....


Using the carabiner area as a makeshift Leatherman bit holder is nothing new, albeit a very loose fit. Also, the frame would want to splay outwards when being torqued. This modification addresses those issues. I created a form fitting Delrin insert that allows for a tight pressure fit of a Leatherman bit. Both the stop pin and the pivot for the scribe keep the frame strong and rigid, preventing it from spreading apart. Capable of medium duty tasks, it is more than adequate to service my other multitools and electronics.....
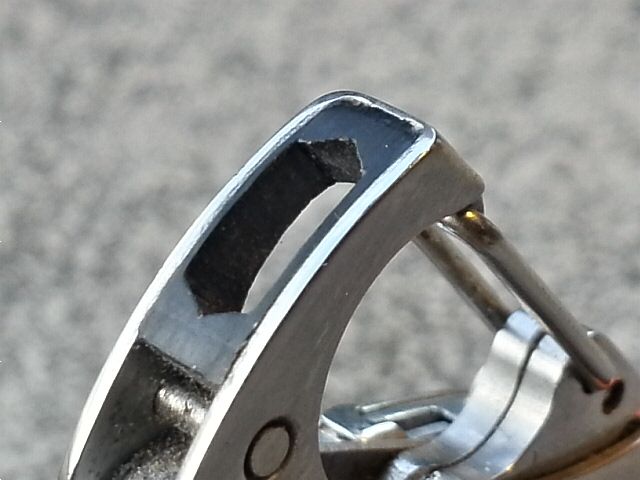


Last but not least, that scale. I've made it no secret. Personally, it is the one thing about this tool that was the most offputting to me. I mean, I understand why they probably did it, to save money and cut corners and all. There were many little details to consider. I duplicated the file rest, which also prevents the file tip from being able to snag on anything. On the underside, I milled a channel for the tweezers. On the outside, holes drilled and beveled. I also went with dual textures, polished and brushed, to further compliment the rest of the tool.....

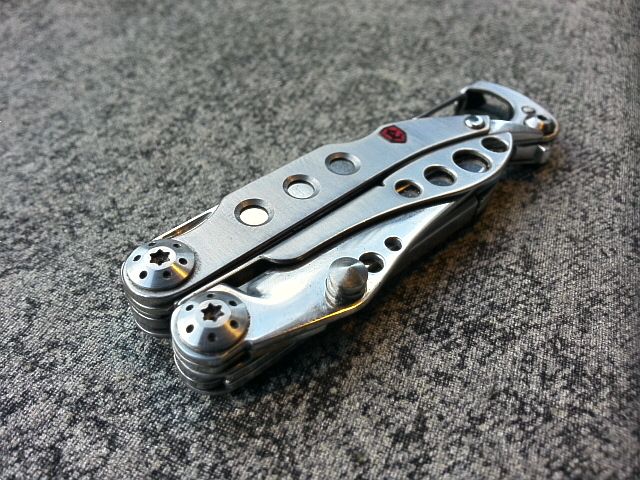
BONUS PHOTOS. Photos with Project Skeletool and with lanyard I made just for this tool for times I choose not to use the carabiner.....


-
As always, great stuff Evil!
That's us mobile.
Nate -
This
Loooks
Awesomeee :ahhh
Great work evil.

-
Evil, no disrepect you your craftsmanship, but I'm a firm believer that all Skeletools's should be melted down to make something useful instead >:D (I think I'm allergic to them, they bring me out in tantrums :P)
As to the Style EV1..... SUPERB!!!
Love the awl. I hate LM's standard awl as they don't have a slow enough taper.
Love the scribe - very clever! Not something I have frequent use for, but when I do I generally have to bodge one from a twist drill ::)
Love the cunning wire strippers. Did you have to replace the pivot, or did they open wide enough to work on when you removed them from the handles?
Love the zytel bit driver. That should be as standard on the CS and PS
Great work as always, feller
 always a pleasure to see what you've been working on
-
Brilliant work

-
Not impressed at all!!! That is just what I expected from you sir, I would be shocked if the results were inferior to this. Your work serves as inspiration to us (I think I speak for most here) and shows how far we can go with a bit of creativity.
Very well said, as well. Fancy steels are nothing without a good heat treatment and proper geometry. And the nail nick issue can indeed be resolved by changing the geometry of the tang, the awl is the stiffest of the tools on my P4 due to a very squarish tang.
Thank you one more time!
-
I feel so... unprepared to even start, when I look at your work. How many hours do you have in that? And what are you doing where you use an awl a lot? And the zytel insert makes this mod, in many ways. The entire upgrade is amazing, but by being able to use flat bits, in a smaller tool... HUZZAH! HUZZAH! HUZZAH! This may be the perfect keychain/ultralight EDC scissors based tool.
The only thing I can see possible left to do with it is to take the gaurds off the side of the file face, so it can be used on things bigger than it is.
-
@ducttapetech said:
As always, great stuff Evil!Thank you, Nate.....
Thank you, enki
@NKlamerus said:
Evil is over here making dreams come true and Leatherman came out with the Signal........
Will they ever catch on?
Great job Evil, awesome as always.Thank you, NKlamerus. I honestly never even gave the signal a look until just the other day. Truth be told, I've had little to no interest in any of their lineup since the time I left here over five years ago, about the time the MUT was being released. Thankfully, I have been blessed with a skillset with which I can modify tools tools to suit my needs perfectly.....
@Sparky415 said:

Always good to see your new work Evil oneThank you, Sparky.....
@Zed said:
Ive never been interested in the style,Till now amazing work as always Evil In the beginning, I was interested in the "idea" of the style, however, for me, the plastic scale never sat well with me and I knew I would never EDC as is. When it got misplaced for years, I really didn't miss it. When I found it again, I wanted to come full circle and modify it to my needs. As it turns out, I use it far more than I ever anticipated and it has really grown on me and is now part of my EDC.....
@SAK Guy said:
:ahhh :ahhh :ahhh :ahhh :ahhh :ahhh :ahhh :ahhh :ahhh :ahhh
:ahhh is a good thing, right? lol
Thank you, Kampfer. I try..... >:D
@50ft-trad said:
Evil, no disrepect you your craftsmanship, but I'm a firm believer that all Skeletools's should be melted down to make something useful instead >:D (I think I'm allergic to them, they bring me out in tantrums :P)
As to the Style EV1..... SUPERB!!!
Love the awl. I hate LM's standard awl as they don't have a slow enough taper.
Love the scribe - very clever! Not something I have frequent use for, but when I do I generally have to bodge one from a twist drill ::)
Love the cunning wire strippers. Did you have to replace the pivot, or did they open wide enough to work on when you removed them from the handles?
Love the zytel bit driver. That should be as standard on the CS and PS
Great work as always, feller always a pleasure to see what you've been working onThank you, 50ft
No disrespect taken. Skeletools definitely aren't for everyone, that's for sure. It took quite a bit of modification of mine to become a tool useful enough that I would carry it on a regular basis.
I never liked Leatherman awls either for the very same reason. Also, for me, the sewing eye is utterly useless. That is unless I were sewing something like a sail with shoestrings, lol. I actually have another new tool to post that addresses this, however, I simply haven't had the time to take photos and write up a post yet.....
I use a scribe quite often. I have made makeshift scribes for times than I can count over the years.....
Once the scissors are removed they can open wide enough to do the modification.....
The bit driver is getting more and more use as time goes by. It fills a niche, working ideally for my flat sided, precision screwdriver bits far better than a larger, heavier tool would....@rdub934 said:
Dear Leatherman,
You're doing it wrong. Hire Evil510, he can show you how to do it right.
Sincerely,
MTOThank you for the praise, rdub934
Doing things "right" is very subjective and not always profitable, which is what matters to them. Leatherman is here, they always have been. In the background, in the shadows. It's all a numbers game, I feel.....@50ft-trad said:
:D:D
Thank you, Steve.....
@sawman said:
Mr. Evil,
You're a G.D. GENIUS!!!!
FANTASTIC work, SirThank you, sawman.....
@WWW said:
Not impressed at all!!! That is just what I expected from you sir, I would be shocked if the results were inferior to this. Your work serves as inspiration to us (I think I speak for most here) and shows how far we can go with a bit of creativity.
Very well said, as well. Fancy steels are nothing without a good heat treatment and proper geometry. And the nail nick issue can indeed be resolved by changing the geometry of the tang, the awl is the stiffest of the tools on my P4 due to a very squarish tang.
Thank you one more time!Thank you, WWW. Certain projects, such as this one, become a labor of love. I put a lot of thought, time and effort into my work. I truly am a firm believer in proper heat treating. When I first connected with my third generation heat treater, he demonstrated to me the difference a proper heat treat makes by doing hardness and sharpness tests on pieces of metal all from the same batch but at different stages of treatment. The differences were like night and day. A real eye opener. As for the tang geometry, when time permits, I actually plan to go through my collection of older tools and address this issue.....
Thank you, tommywp.....
@Demel said:
First off great work I always enjoy see your craftsmanship. What I love most is how you waste no space at all and use every inch a tool to get the most from it. Very nice
Thank you, Demel. Making use of unultilized space is a philosophy that I try to integrate into all of my tools.....
@ironraven said:
I feel so... unprepared to even start, when I look at your work. How many hours do you have in that? And what are you doing where you use an awl a lot? And the zytel insert makes this mod, in many ways. The entire upgrade is amazing, but by being able to use flat bits, in a smaller tool... HUZZAH! HUZZAH! HUZZAH! This may be the perfect keychain/ultralight EDC scissors based tool.
The only thing I can see possible left to do with it is to take the gaurds off the side of the file face, so it can be used on things bigger than it is.Thank you, ironraven. This project has many hours in it. How many I could not tell you as I only worked on it an hour here, two hours there, skipped days or even weeks, etc. I do a lot of fabrication with plastic sheets and light gauge metal. I use a nibbler a lot, which needs a starter hole to get going. With an awl, I can make a clean starter hole in no time flat. I also use my awls to make holes for bolts/screws, scribing on plastic and wood to mark cut lines. Awls really are one of my most frequently used tools. This is actually my go to tool now for the times when I need to use the Leatherman type, precision screwdriver bits that I made years ago. While they fit perfectly in all of my other tools, Wave, Surge, etc., the weight of them made it difficult to do precision work. Hope that made sense. As for the removing the guards on the file. If you are referring to something like what I did with my Micra, I actually already did it to the file on this tool, only it was done after these photos were taken. I have been testing this tool for the past month. I held off on doing so at first because if you look where the nailnick is located, removing the guard in turn makes the nailnick more shallow. I needed to make sure there were no deployment issues. About two weeks in, I decided to go ahead and do the mod. If I get the time, I can post additional pics later....;.





Hello! It looks like you're interested in this conversation, but you don't have an account yet.
Getting fed up of having to scroll through the same posts each visit? When you register for an account, you'll always come back to exactly where you were before, and choose to be notified of new replies (either via email, or push notification). You'll also be able to save bookmarks and upvote posts to show your appreciation to other community members.
With your input, this post could be even better 💗
Register Login


