
John's Unabashed STACK Challenge Thread: 2 - 31 March 2016
-
I like the thread and the pics
 The CT 34 is getting quite a workout :D
-
@Poncho65 said:
I like the thread and the pics The CT 34 is getting quite a workout :DThanks!
Documenting something daily is showing me how much I actually use a SAK, whether it's something trivial like opening mail or more significant like disassembling the stove to replace the range top igniter. Normally it would be any one of a number of SAK that would get to do all this, but for the STACK challenge, I have to remember to get the Cyber Tool 34 to do the work and photograph it.
John
-
I like the thread and the pics
The CT 34 is getting quite a workout :DThanks!
Documenting something daily is showing me how much I actually use a SAK, whether it's something trivial like opening mail or more significant like disassembling the stove to replace the range top igniter. Normally it would be any one of a number of SAK that would get to do all this, but for the STACK challenge, I have to remember to get the Cyber Tool 34 to do the work and photograph it.
John
Seems like you are doing very well with it though
both in remembering to use it and the use of it for this thread 
-
Day 17 -- 18 March 2016
Skinned and cubed a mango! Main blade on the Cyber Tool 34 made short work of it . . .


Wanted to show how the two halves are separated from the flat, pear shaped pit, but that's very much a two-hand operation. One hand is needed to handle the iPhone to do these photos.
I confess completely! A mango was, indeed, ruthlessly sacrificed for this photo shoot, mercilessly skinned and quartered . . . more than quartered . . . as much as sixty-fourthed or more. I must further confess that it was plump and ripe, begging to be consumed. It was good, very good and I thoroughly enjoyed it. No apples, pears, kiwi fruit, avocados, oranges, grapefruits, tangerines or pineapples were harmed in any manner, if that's of any meager consolation.
John
-
Day 18 -- 19 March 2016
Opened more mail using the Cyber Tool's very sharp small pen blade . . .

The stockpile of Tinkers grows as I sift through them for the ones with blades damaged beyond reasonable restoration, typically bent, very badly nicked up, or with a badly reground edge, to be used as Phillips organ donors. May use a couple of the better ones and put corkscrews into them and convert them into Spartans. The Tinkers in excellent condition will probably get cleaned up, have some scale restoration done, and get gifted to friends and relatives.
One of these also contains a 74mm Executive in superb condition that will be sent to my brother's significant other . . . who wants a SAK or two with scissors and a nail file! There's already a Rambler set aside, the Executive is in this pile, and found a Delemont EvoGrip 16, all of which have scissors to run with and nail files!
John
-
Day 19 -- 20 March 2016
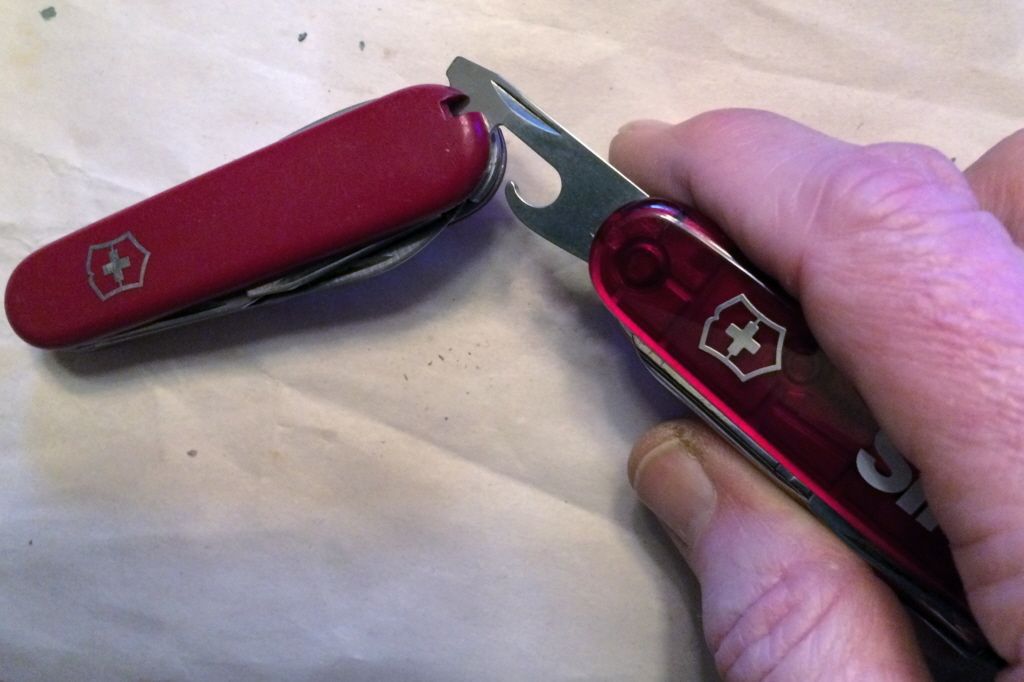
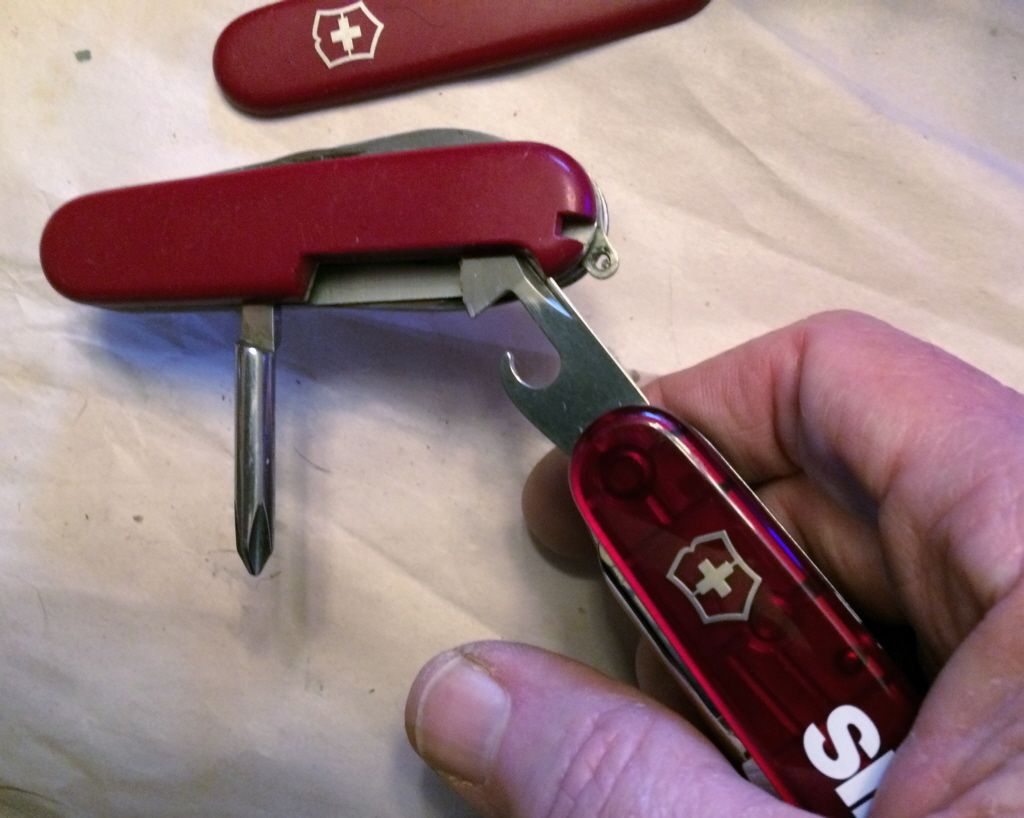
Removed the scales on this small Tinker using the can opener on the Cyber Tool 34. I normally use a watch case knife for popping the snap-on back off of watches. However, this shows how the can opener can also be easily used for the task, slipping its sharp edge between the scales and liner.
John
-
Day 20 -- 21 March 2016
The scissors on the Cyber Tool 34 are used to cut open a new LED AAA Mini MagLite. Slightly smaller than the AA Mini MagLite with more light than the LED Solitaire. These bubble packs made for retail store pegs defy opening by hand, undoubtedly to prevent loss of contents to the less than honest.

Two-thirds of the way there!

John -
Day 21 -- 22 March 2016
The recalcitrant reprobate Bunn coffee maker is acting out again. With all the other cleaning and descaling, including some internal using a tool Bunn provides with the coffee maker (a long spring, about the diameter of a screen porch door spring, the kind that slams the door shut), chips of crudmium made their way into the spray head that dumps water into the filter basket with the coffee grounds. This is what it looks like from the top that screws onto the coffee maker. The other side looks like a simple shower head with about 5 or 6 small holes. I'm using the Cyber Tool 34's tweezers to pluck some of the flakes of crudmium out that are too big to flush out with water.

It's working again, for now. I'm determined NOT to buy a new coffee maker!!
John
-
Day 22 -- 23 March 2013
Got a 3V LED bulb in today to replace the incandescent bulb in this twin AA flashlight. It's a drop-in that is considerably brighter with whiter light, and consumes much less power, extending the life of the cells. Anyone who was around U.S. Army aviation, especially fling-wing (the aircraft that flog the air into submission), may recognize this penlight as it's one that pilots often carried and used. Has a built in red lens that can be slid over the bulb using a small button on the head. Came with the black "lanyard" shown . . . which those of us who were ground pounders would tie to our LBE referring to it as an "idiot cord." It enabled reeling it back in if it was dropped in the middle of the night with a new moon, under triple canopy foliage. You'd never recover anything that got dropped accidentally under those conditions, unless you could reel it back in. The only thing darker is underground in a mine or cavern around the corner from the entrance.

Most twin cell flashlight bulbs are bayonet with flange, but this one screws into a spring that keeps the + terminal on the forward battery from coming into contact with the bulb base until you push on the button on the base of the flashlight, or screw down the sleeve around it to keep it on. Screws in easily, but trying to unscrew one tightens the spring around the threads which makes bulb removal difficult. It also keeps the bulb from coming unscrewed accidentally on its own, so I'm confident that's part of the design consideration.

Instead of using brute force and ignorance trying to unscrew it directly which tightens the coiled spring around the bulb threads, I dug out the Cyber Tool 34 and pushed on the top of the spring coil while holding the bulb (this takes two hands). Doing so uncoils the spring slightly, reducing friction, and Bob's your uncle, it comes unscrewed.

New LED bulb is installed, and the flashlight head can be reassembled to the body.

Now for the all important Smoke Test, to see if any smoke leaks out when I turn it on. First without the filter to see how white and bright it is, and it's much brighter than the incandescent bulb was.

Now for the red lens test to see how much red spectrum we get from the bright white LED light. Looks very good.

Another victory for the Cyber Tool 34!
John
-
Sliced the pit out of a mango using the large blade on the Cyber Tool 34. If you've never seen a mango pit, this is what one looks like and it's about the same shape as the mango that surrounds it. The best method of separating the meat from the pit is making a slice around the mango's edge down to the edge of the pit. Then one makes four slices, two on each side, from top to bottom from the edge to about half-way across the mango following the surface of the hard pit. The two halves then separate from the pit in the middle, which you can gnaw on to get the small amount of meat that remains attached to it (which I did before making the photo). The meat on each half is then diced off of the thick skin as I showed in the previous mango gutting and skinning photos using the small blade.

John
-
Day 26 -- 27 March 2016
The deadlatch on the back door to my house is no longer working. When attempting to close the door earlier today it abruptly stopped with the latch failing to push back into the door at the striker plate, and I had to rotate the knob very slightly to free it and close the door.
When closing a door, the latch should retract when its curved bevel is pushed back into the latch mechanism by the curved bevel on the striker plate. The additional pin seen on the inside of the latch is a "deadlatch" which is found on exterior door locksets. When it's extended as seen here, the main latch should be able to be pushed back into the latch mechanism along with the deadlatch pin. When the door is latched, the main latch itself extends back out, but the deadlatch pin is blocked from doing so by the striker plate as there's no opening in the plate for it. This prevents the latch from being pushed back into the latch mechanism, but it can still be retracted by turning the door knob. It's only found on exterior door locksets and it's intended to keep someone from jimmying the door open using a card, screwdriver or as is commonly attempted now, a thin 2x4 inch strip cut from a plastic soda bottle (which can be worked around door jamb corners to attempt manipulating the latch).

First step was removing the knob to investigate why the deadlatch was no longer working properly when closing the door. Used the Cyber Tool 34 #2 Phillips bit to remove the two long Phillips head machine screws holding the interior and exterior knobs together with the door sandwiched between them.

Once removed, it's obvious looking at them the problem is not with these two parts as all they do is retract the latch with the lockset allowing rotation of the square pin that retracts the latch when it's unlocked and preventing rotation when it's locked. Indeed, I was 99.9% certain the problem was not with the knobs and their lockset, but the knobs with the lockset must be removed before the latch mechanism can be removed. I've changed entry knobs and locksets, including the tumblers in them (and reset their keying with new tumbler pins) numerous times, along with deadbolt mechanisms. It's not the first time I've had these things apart, although it's been a while with Schlage as these were put in by the door installer, and I'd had Kwikset high security locksets for the twenty years prior to these. Basic operating principles are much the same, with the differences being in their mechanical design details to implement them. It's an extremely mature technology.

The latch mechanism is held in place by two Phillips head wood screws on the edge of the door and removing it is simple once the knobs are removed.

Once out the failure is not immediately obvious on its exterior. It is also evident that while I could disassemble it if I wanted to determine failure cause and attempt to rectify it, that this was not designed for disassembly. Note the twist tab along the top at the back of the latch mechanism. There's a matching one on the other side. These would have to be twisted back vertical and the plates removed to go any further. I've torn down products to document how they were fabricated and assembled in manufacturing them, including the processes used, as a part of my work in the past. It's not that I couldn't take it apart, it's the risk of not being able to reassemble it very easily and the consequence of not being able to lock, or even latch, an exterior door on my house, until it was successfully reassembled. Even then, there was no guarantee that whatever had failed was repairable. More likely than not, a part was cracked or broken inside. I've had the equivalent Kwikset high security deadlatch mechanism apart in the past. Its numerous internal springs made it a time consuming nightmare to reassemble.

I reassembled the latch and knobs onto the door. It's currently operable by turning the knob very slightly until a new deadlatch mechanism can be obtained. Schlage has a limited lifetime warranty on residential their knobs, latches and locksets (long term finish durability is not part of that), and that includes the deadlatch. Made a call to Schlage after reassembling everything and identifying the specific door knob style and its finish. Schlage is sending a new deadlatch which I should have in a week or so. In the meantime, the latch is functional, albeit currently listed among the walking wounded.
This deadlatch failure with these exact symptoms is not uncommon for Schlage exterior door locksets. They usually occur with about five years age, perhaps longer, depending on how much the door is used.
John
-
That Cybertool is getting some good and useful use this month!

Certainly more than my SwissChamp got when I did the challenge. Most of the time I only used it to cut apples and open envelopes with new SAK's :D -
@glenfiddich1983 said:
That Cybertool is getting some good and useful use this month!
Certainly more than my SwissChamp got when I did the challenge. Most of the time I only used it to cut apples and open envelopes with new SAK's :DThanks. There never seems to be any end to the projects that arise. Entropy reigns supreme in my house. I must remember to reach for it instead of the nearest one at hand or in my pocket and take a few photos with the iPhone to keep the STACK challenge going with it. If you look at all the days, it has been used it to dispatch a couple mangoes, an apple and a number of envelopes (most with new SAKs) :)
Thanks
John -
@Humppa said:
Great thread... :)Love to see the CT34 working so hard. Well, you seem get a truck load of packages every day. I mostly get envelopes with invoices contained instead of nice SAKs

Thanks. Entropy is very much alive and well in my house. As a consequence there's been no shortage of things to do with the CT34. The packages will be slowing down as I've acquired what I'd like to have. Much more user than collector. Some of the most recent have been used SAKs for cleanup and refurbishing to give to my brother, his significant other, and a good friend.
Stockpiled some Tinkers and Waiters to convert into Apprentices and a couple Spartans. Got some extras presuming the learning curve would entail one or two failures with liner damage before getting it right, but it had greater success than anticipated. It's resulted in some extras I can give out to other friends as opportunity arises.
What I didn't show were some of the invoices . . . which were also in the mail :)
Thanks
John


Hello! It looks like you're interested in this conversation, but you don't have an account yet.
Getting fed up of having to scroll through the same posts each visit? When you register for an account, you'll always come back to exactly where you were before, and choose to be notified of new replies (either via email, or push notification). You'll also be able to save bookmarks and upvote posts to show your appreciation to other community members.
With your input, this post could be even better 💗
Register Login


