
Edge Pro Apex Sharpener
-
Ok after watching the video I'm interested......... Need to do some more research as I do like my Lansy however it does have limitations. The bullet point text of the modded Ruixin certainly has my attention.
-
@kreisler said:
@Poncho65 , what's your current system or method for sharpening SAK/MT blades?
I have a lot of different system and use them for different blades but I mostly freehand

I do have a Lansky, Sharpmaker and several different grits of diamond stones and many different sizes as well
 Plus I have a strop or 2
-
Great thread with lots of cool sharpening gear
/topic/67335
-
@Poncho65 , thanks for the link. Btw i don't believe that the original Lansky (or any other clamp-based system) is really suitable for our narrow SAK blades or edc-sized MT's like the SpiritX. No doubt that the Spyderco Sharpmaker is .. but it's expensive (main product, additional rods, replacement rods after breakage) and I would be really worried to break or to drop or roll away'n drop such a ceramic rod. Never mind, i am sure it's a highly effective system for just sharpening (but not for re-profiling).
The Ruixin comes with a clamp, too, but thanks to the magnets i don't need to fumble with the clamping 2nd stainless steel plate. With the Lansky, 1 hand must(!) hold the clamp. With the Ruixin, 1 hand can (if needed!) support the knife handle, with minimal force; in the below pics this minimal force is illustrated by a brush lol.Oki, lemme add some more relevant user information, sharing info or enthusiasm is fun (Matthew 7:37)
One imo annoying problem with Lansky-type of clamps is that it is difficult/impossible to memorize the exact position (X-coordinate, Y-coordinate) of the clamping tip on the back of the knife AND the orientation (rotational degree) of the blade with respect to the clamping tip. This (X/Y/degree) data set would be needed, when you came back to the Lansky after having used the knife for months and didn't want to lose patience by guessing about where/how you had clamped the knife in the Lansky clamp; and even if you had noted down such a data set, it would take some efforts to **setup **the knife clamping **exactly **according to this data triplet. Probably a pita, or not very precise in practice!
The Ruixin simplifies things and offers higher precision in this regard:
typically, i.e. for short to medium-length blades, the magnets function as stopper for the knife handle. Then you'd set the distance of the stainless steel (SS) blade stopper, and preferably in the middle/straight position. For top precision, one could swivel the blade stopper, in order to support ("stop") the blade in an optimal way, but with regular-shaped EDC knives you can just leave the blade stopper's orientation in the middle/straight position, no problem.However, the point of this post is to demonstrate the blade stopper swiveling.

Setting up the SpiritX on the Ruixin is done super easy/fast: you only need to set the blade stopper's distance, 11.70mm (including the thickness of the black duct tape):
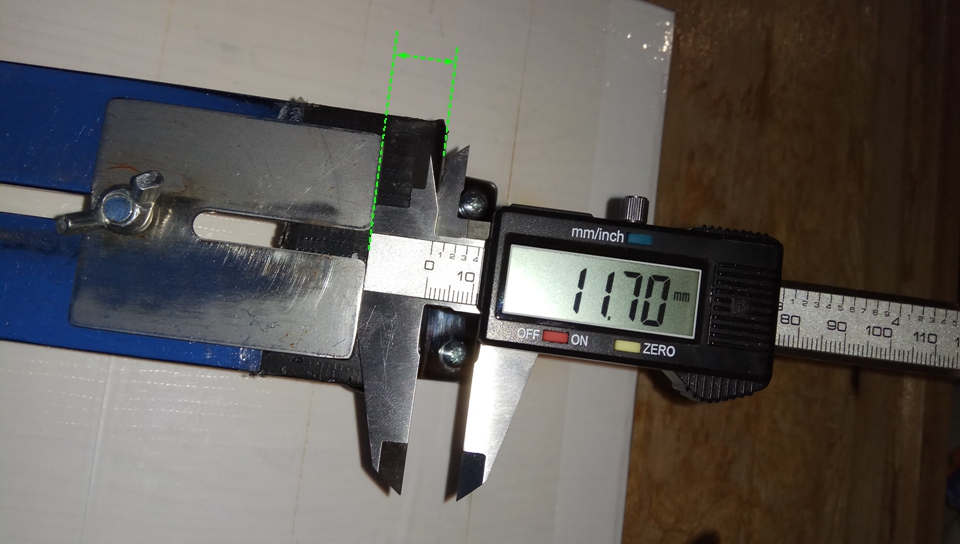
That's it, you're done, nothing else to take care of! Why? Because the handle is stopped naturally by the Ruixin, perfectly flush // aligned. On one side by the rim of the Ruixin frame:
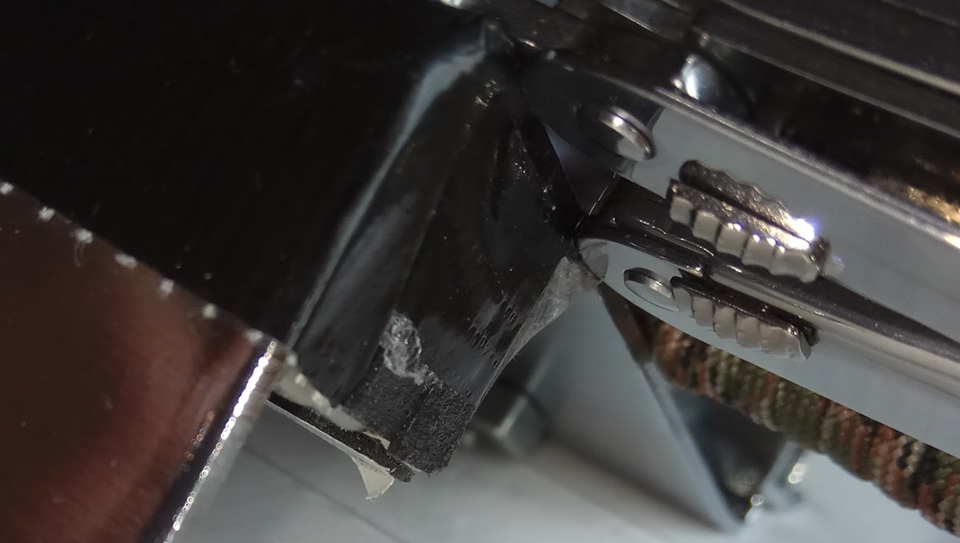
On the other side by the magnets. The length of the magnets equal the width of the Ruixin frame:

With this 'natural stop', the SpiritX blade is not perfectly parallel to the Ruixin edge but the situation is acceptable because of the circular range of the guiding rod:

Here a pic showing the blade stopper swiveled back to "stop" the blade from sliding down the slope:
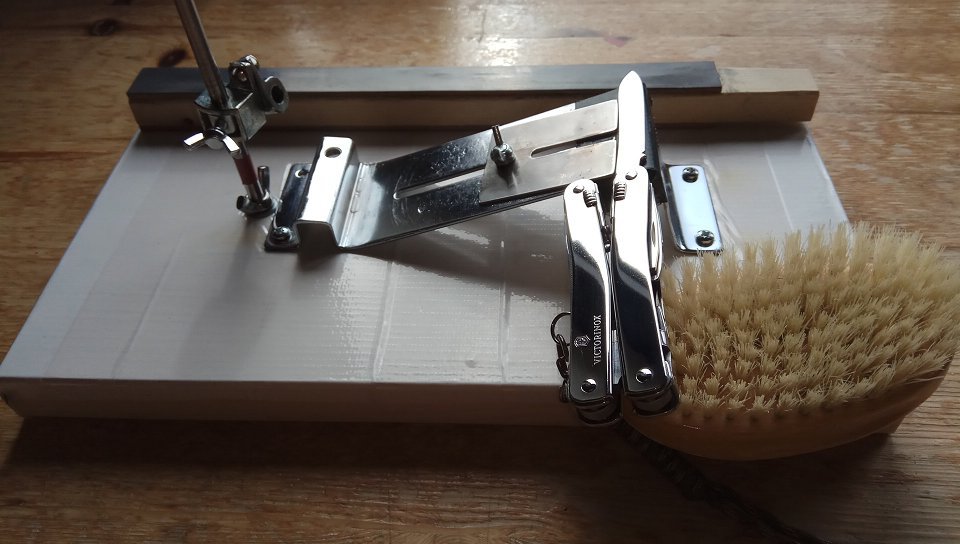
And a close-up. If this was a regular EDC knife, the blade stopper would also prevent any rotational degree of the blade; in any case the blade stopper would help to orient the blade correctly at once! Since there is no clamp, no clamping mechanism, there is nothing 'in the way' of the guiding rod, no obstacle. You could sharpen very acute angles and even on such narrow blades:

Because of the circular range of the guiding rods my presented 'lazy method' (i.e. 1 fixed position per knife side) is most suitable for sharpening short to medium-length convex blades. Longer blades or blades with long straight sections would require sharpening in segments; this is valid for all Lansky-type sharpeners btw! Luckily the straight section of the SpiritX blade is short and the natural stopped position is just fine, so the lazy method applies:
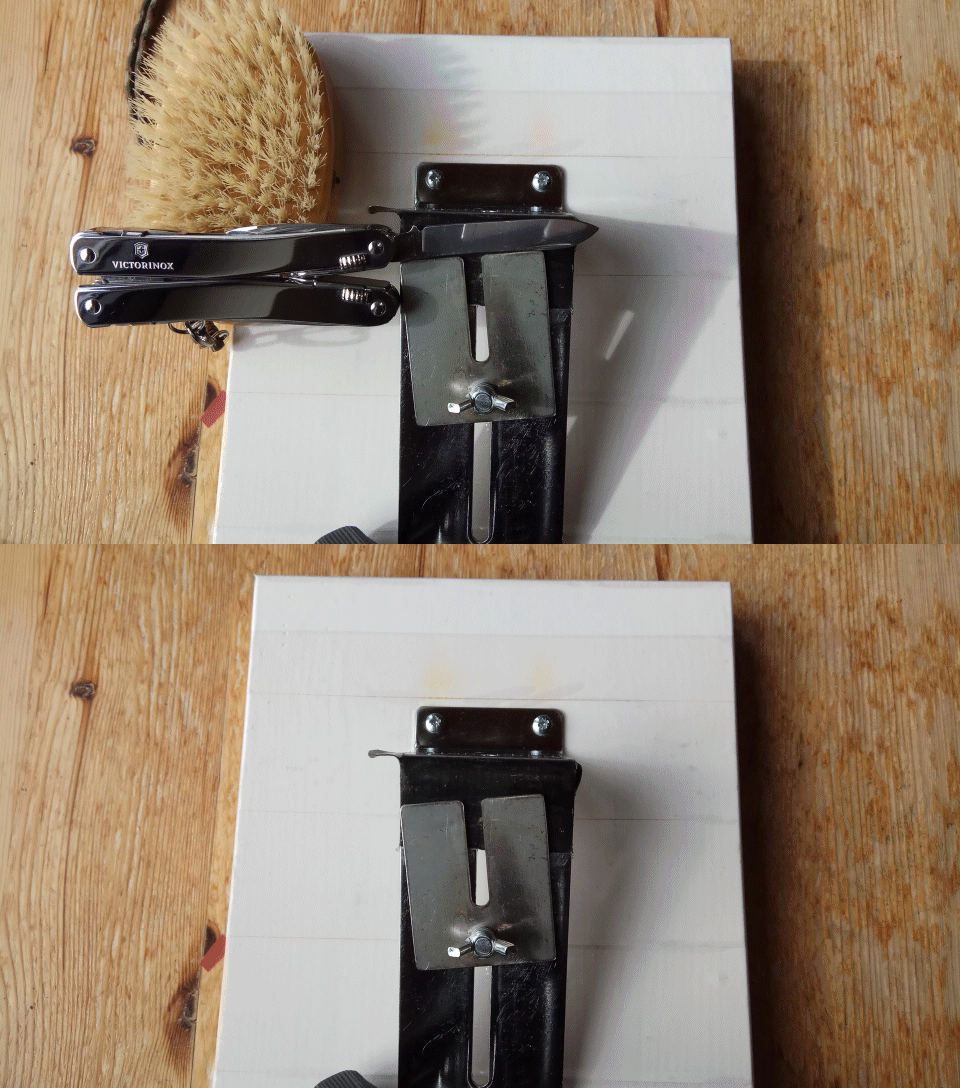
Swiveling the blade stopper is often not really needed; instead, starting from the middle/straight position of the SS blade stopper, one could simply turn the knife 1 or 2 degrees to expose the knife edge in parallel to the Ruixin edge. This could be called a 'lazy method' too, because you'd be too lazy to swivel the SS blade stopper every time when flipping the knife side. I find this animated GIF mesmerizing hehe:

Concave blades or concave blade sections cannot be sharpened with flat whetstones; the LM Surge and filleting knives have S-shape blades. So here is another example where i made use of swiveling the SS blade stopper in order to get a single fixed sharpening position per knife side. The lazy method. Note that, because of the length of this filleting knife, i couldn't use the handle as handle stopper. There is no handle stopper with long knives! Instead, i measured and noted down the distance of the tape marking. Coincidentally the width of the tape, 50.0mm, matches the width of the SS blade stopper. Very helpful for aligning the blade along the SS blade stopper:

In my next post i should talk about the Apex knockoff whetstones which i use: RUIXIN (cheap great!), ANSELF (not necessary!), ADAEE (cheap cr*p!).
By the way, back then when i was shopping for a multitool, i chose the Spirit, Model X, expressly because of the ease of sharpening the main blade. I didn't know anything about sharpening but i knew that sharpening the Model X blade would be much easier and straight-forward than sharpening the butter knife. Nowadays it's the same .. when or if i go shopping for a new knife .. If i couldn't imagine sharpening it on my modded Ruixin, i wouldn't buy the knife! S-shaped knives are a no-go for me, for this reason.
Again, this post was not about How To Sharpen the Victorinox Spirit X , but to demo the swivel functionality of the Ruixin SS blade stopper. The SpiritX treatment on the Ruixin was a 1 step process (1500grit RUIXIN stone only!) and took very few minutes. Then 1min ruixin balsa strop. Then leather strop iirc.
-
Such a great post

-
I've never used the Edge Pro, or the aforementioned Ruixin, but I started out understanding the mechanics of sharpening with a Lansky. I have now walked away from the "systems" and now reprofile and fix major anomalies with a Worksharp Knife and Tool Sharpener, and do normal edge maintenance freehand. As I see it, the systems fill two criteria; they let those who cannot sharpen freehand to get a good working edge, and they also enable those who are chasing the most awesome polished and symmetrical edges. I just want my knife to be able to cut stuff :D I can understand why these rigs have an appeal for certain people, but it's way more than I need for my own purposes.
The other benefit from these systems (if you can accurately recreate the same angle every time) is they minimise metal removal in the sharpening process. My approach is to do this via stropping or steeling, or with such as a puukko, just whetting the edge slightly rather than trying to rework the entire bevel. For those with premium knives or who otherwise put worth in chasing supreme edges, I have no doubt that rigs like these are a sound investment. However, for those who just want a knife that works properly (and I prefer a slightly more toothy edge anyway), a better investment IMHO would be the time to learn various techniques of sharpening freehand
-
50ft your response almost describes me. I find myself not satisfied with sharp or sharp enough or wicked sharp :D. I also find myself irritated with uneven bevels
 . I've used stones in the past exclusively then went to a "simpler" method by using guided systems. My first step to getting my edge back is always the strop. For re profiling to suit my needs I have used the Lansky and really enjoy that system. I buy used knives and they tend to come with less than suitable edges not to mention damage in some cases. I have 4 stones now and enjoy free handing certain knives but others seem to demand even bevels and insanely polished stupid sharpness. I cannot lie, I chase scalpel sharpness. I'm not sure when this happened but I'm good with it. This is not to say all my edges have to be that way. My MT knives are sharper than factory and certainly more refined but I know when to call it good on those ;).
-
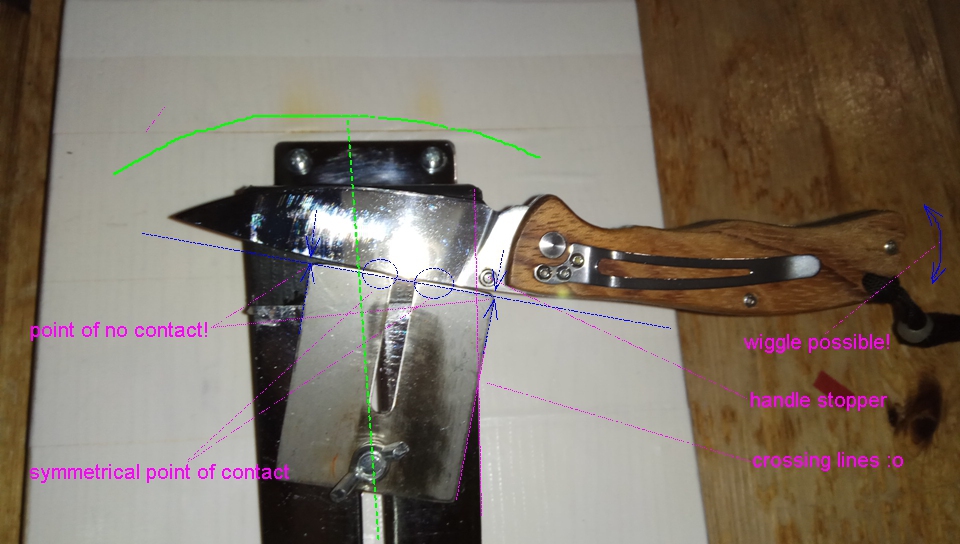
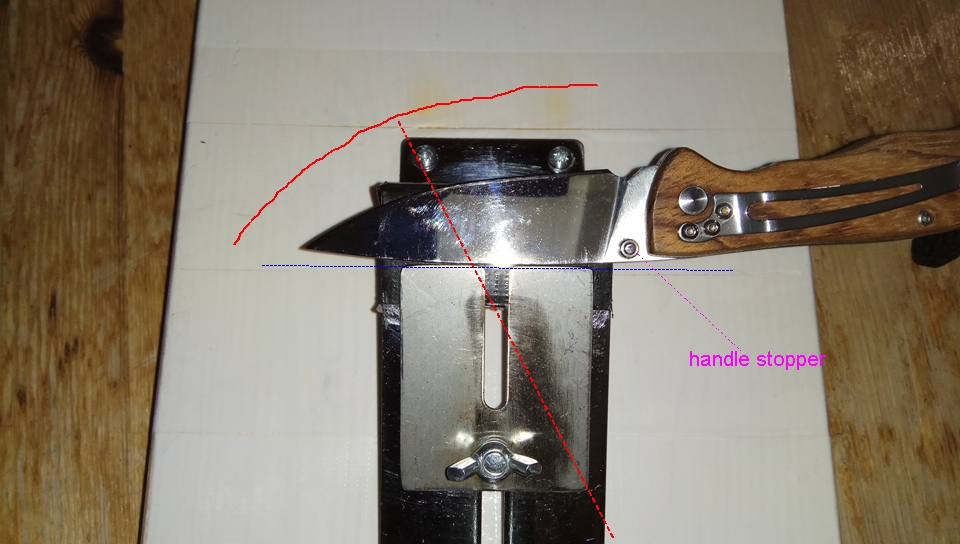
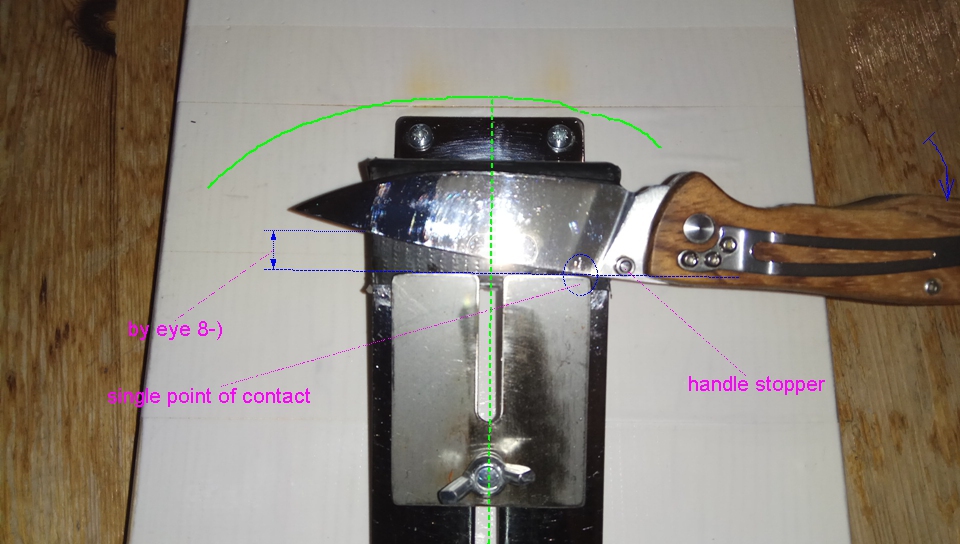
At last 3 more pics explaining visually how a typical regular shaped EDC knife could be setup in a single position on the Ruixin. Note that in all 3 setups the knife, which has a full flat grind, is completely held by the magnets; one could sharpen it single-handedly, in theory. In practice there is tiny wiggle space between the back of the knife and the SS blade stopper, because the back of the knife is curved, not straight. With this in mind, it's best to hold the handle with 2 fingers, while you're sharpening with the other hand. Also, the thumb stud always functions as premature handle stopper, which is welcome.
In the 1st setup, the knife edge (its curvature) is perfectly oriented with respect to the Ruixin guiding rod or the center of the circular range. To achieve this perfect orientation we had to 1) swivel the SS blade stopper and 2) swivel it even beyond the side of the Ruixin, see the crossing lines! This is no real problem, but it would take efforts to swivel the blade stopper back and forth and get its angle (rotational degree) always right:
The knife edge is convex at all times. Perfect for Ruixin use then? Yes, but only if you orient the edge as good as it gets with respect to the center of the circular range ("concentricity"). In the 2nd setup, we were too lazy to swivel the SS blade stopper. As you could tell, the knife edge (its curvature) looks off-center, not concentric. This, too, is no real problem, because the blade is not long, while the Ruixin guiding rods are long. You could sharpen this EDC-sized knife in this very position but i would not recommend it. The position is not optimal, i hope you can see and agree:
Personally, i use the 3rd setup. In this setup, i am too lazy, too, to swivel the SS blade stopper. However i do turn the knife a few degrees, until the knife edge (its curvature) looks nicely oriented, concentric. I could mark this position with a piece of red tape on the Ruixin frame but if you have good eyes, you could try to remember the necessary distance (along the Ruixin side) by eye. With this setup, for sure you will need 1 hand (2 fingers) to hold the handle/the knife in this swiveled position. Do you prefer to swivel'n fix the SS blade stopper (see the 1st setup) or, instead, swivel'n hold the knife (this setup)? I prefer the latter because flipping the knife side is much faster this way. And as you know, we need to flip the knife side very often, for example at 1500grit stone, when reducing the burr with the same grit stone in a gradual manner:
-
I've been using an Edge Pro for a number of years, mostly for cutting bevels on the high carbide steels. It works well after a bit of getting used to, but its way overkill for sharpening SAKs and MT blades, which are butter soft in comparison.
I mostly freehand these days using Diafolds, with a finishing step on the Sharpmaker.
-
SAKs and most EDC blades with softer steels benefit from many types gear to get them hair popping sharp. I think tools like this particular device appeal to those who enjoy the process and like the mental aspect.
-
Apart from tens of hours of practice required for mastering freehand sharpening, being a right-hander makes it difficult to sharpen both knife sides 99.9% equally well. Similar to playing tennis or table tennis, naturally one side (or movement/stroke) comes out easier or better, usually the player's forehand; only pro players have an equally great forehand topspin stroke and backhand topspin stroke. In fact, in table tennis it is commonly accepted knowledge that the backhand topspin stroke is the most difficult (basic) stroke in the sport. All amateur players have a s*cking backhand stroke, never mind a backhand topspin stroke.
I am a righty but use my left hand for operating the guided rod on knife side A, and use my right hand for operating the guided rod on knife side B. Body-symmetrical operation, very satisfying feeling! No force, no efforts or concentration needed. My left hand/arm is very weak anyway. It is actually one of the most relaxed physical activities i do in my bedroom ;). Also relaxing. No sweat. Including the operation of the ruixin balsa wood strops. But then comes the treatment on the leather pad strops: often i would need to stand up for this activity, be focused that my stropping strokes are within the perfect range, and can't let my thoughts wander. There's always some amount of mental concentration needed! Freehand sharpening and freehand stropping are clearly physical activities, body, arms, wrists, mind form a harmonious interplay; your heart rate increases a bit, and some big guys may even start sweating, especially depending on the knife size and the strop size :D.
In contrast, operating the Ruixin - i always sit on a chair for it! - is as physical an activity as operating a PC mouse on the same *desktop *
 and similarly a "single-handed" operation (unless you insist on calling my thumb and index finger supporting some fractional weight of the handle not a single-handed operation anymore ::) ). The Edge Pro Apex operation is a bit more physical, most youtubers seem to stand in front of a *countertop *and you certainly make full use of both hands, plus the concentration needed to slide the knife blade back and forth, per knife side. The Edge Pro Apex has a non-swivel SS blade stopper but no magnets, so my super-relaxed lazy method wouldn't be possible.
Apart from the perfect geometry sharpening result, polished or not, i do enjoy how fun it is, because the process is so easy and exactly re-setting up the knife ( **1.**Ruixin parameter height of the guiding rod wingnut, **2.**Ruixin parameter distance of the SS blade stopper, and for long knifes the 3.Ruixin parameter distance of the tape marking on the blade ) so fast. And yes i can keep and reproduce the exact factory bevel (angles) .. something which is not possible with the fixed angles of Spyderco Sharpmaker.
Even though the sharpening principle is the same, the Lansky principle, the point is really made by the actual end product: i absolutely disliked re-setting up the knife in my Exduct and operating that sad product. No fun, no joy, and limited results. From what i can see, the Exduct is a 1:1 clone of the Lansky, just with inferior build quality.
I regret having bought the Exduct in May 2012 (SKU:SP931D , total US$31.74 shipped) but am honestly happy now with my modded Ruixin. I'd consider it a crime for Exduct company to still offer that @#$%&! Lansky clone, shame on that Chinese vendor.
btw if i owned the Edge Pro Apex, i wouldn't be interested in the Ruixin because both are very similar systems. However, if i didn't own the Edge Pro Apex but 'only' a clamp-based system like Lansky/Exduct/Gatco/Vipersharp/Wickededge/etc and liked certain aspects of it, then I'd definitely look into the budget-friendly Ruixin. Interestingly the Ruixin seems extremely popular in the Ukraine&Russia (most Ruixin youtube reviews are in Russian language), from where also the Hapstone Pro premium product originates.
The following YouTube demonstrates my lazy method of 1 fixed single position per knife side, relaxed single-handed sharpening, (non-tape) marking on the blade, swiveling the blade with every flip of the knife side (thanks to a superior blade stopper which doesn't need to be swiveled itself!):
https://youtu.be/6VCAsBadIrc -
@Brock O Lee said:
its way overkill for sharpening SAKs and MT blades, which are butter soft in comparison.I mostly freehand these days using Diafolds, with a finishing step on the Sharpmaker.
i tend to agree that guided rod sharpening systems (Lansky, EdgePro, Ruixin, WickedEdge, Exduct, etc) could be called overkill for sharpening narrow and or thin blades such as SAKs and MT blades. but even before calling names, in many/most cases it is the physical/constructional limitations of the system which simply does not allow proper sharpening treatment and operation of the "small blade" (Def. "small blade" = a blade which is either thin or narrow or both) on the system. For sure it would be overkill to sharpen a Vinox Minichamp on any guided rod system. However in the case of Vinox Spirit X, as shown earlier, or Leatherman Surge, as shown in this post, the Ruixin is not an overkill but a very apt tool for sharpening and also for guided stropping.
On the EdgePro Apex/Apex Clone, the user typically moves the (medium-sized) blade back and forth on the narrow plastic 'table top'. On the Ruixin, i leave the (medium-sized) blade fixed on the narrow metal 'table top', the 3 block magnets would hold the blade and knife in place; and, typically, i operate the Ruixin one-handedly or use the other hand for minor support, as indicated here with the Surge and my brush. Fixed positions are easy to reproduce and more precise in the operations (angles, movements, sharpening), that's why i wouldn't want to move the blade back and forth on the system's table top.
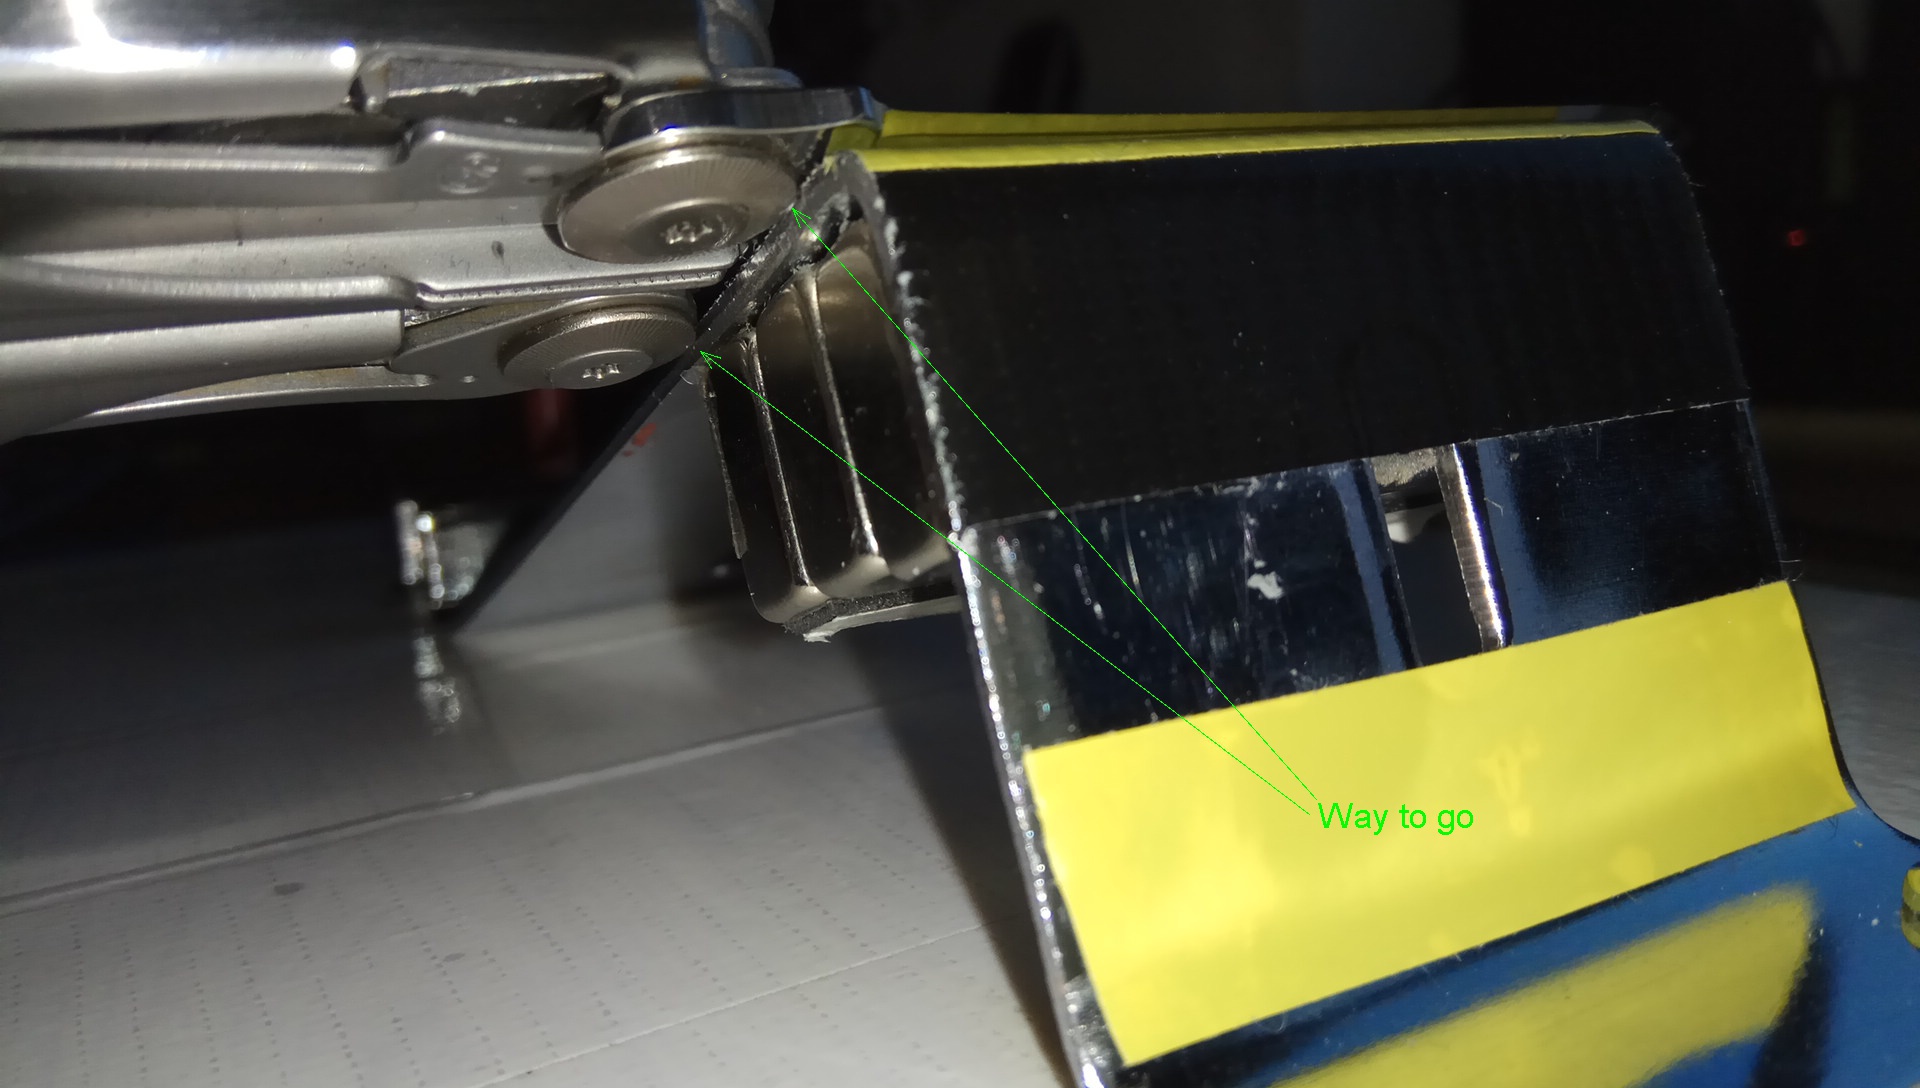
For fixing the Surge blade position relative to the table top, it is very fortunate that metal elements/parts of the Surge tool help us in 2 ways: the elements serve as blade stopper (in the X-direction) and they serve to set and fix the orientation of the blade!
In the following pic, you can see the green tangent. This tangent line is where the Surge gets stopped at the Ruixin frame, but it also sets the exact orientation of the blade automatically, because the tangent is supported by 2 metal parts, i.e. mathematically 1 straight line defined by 2 points:
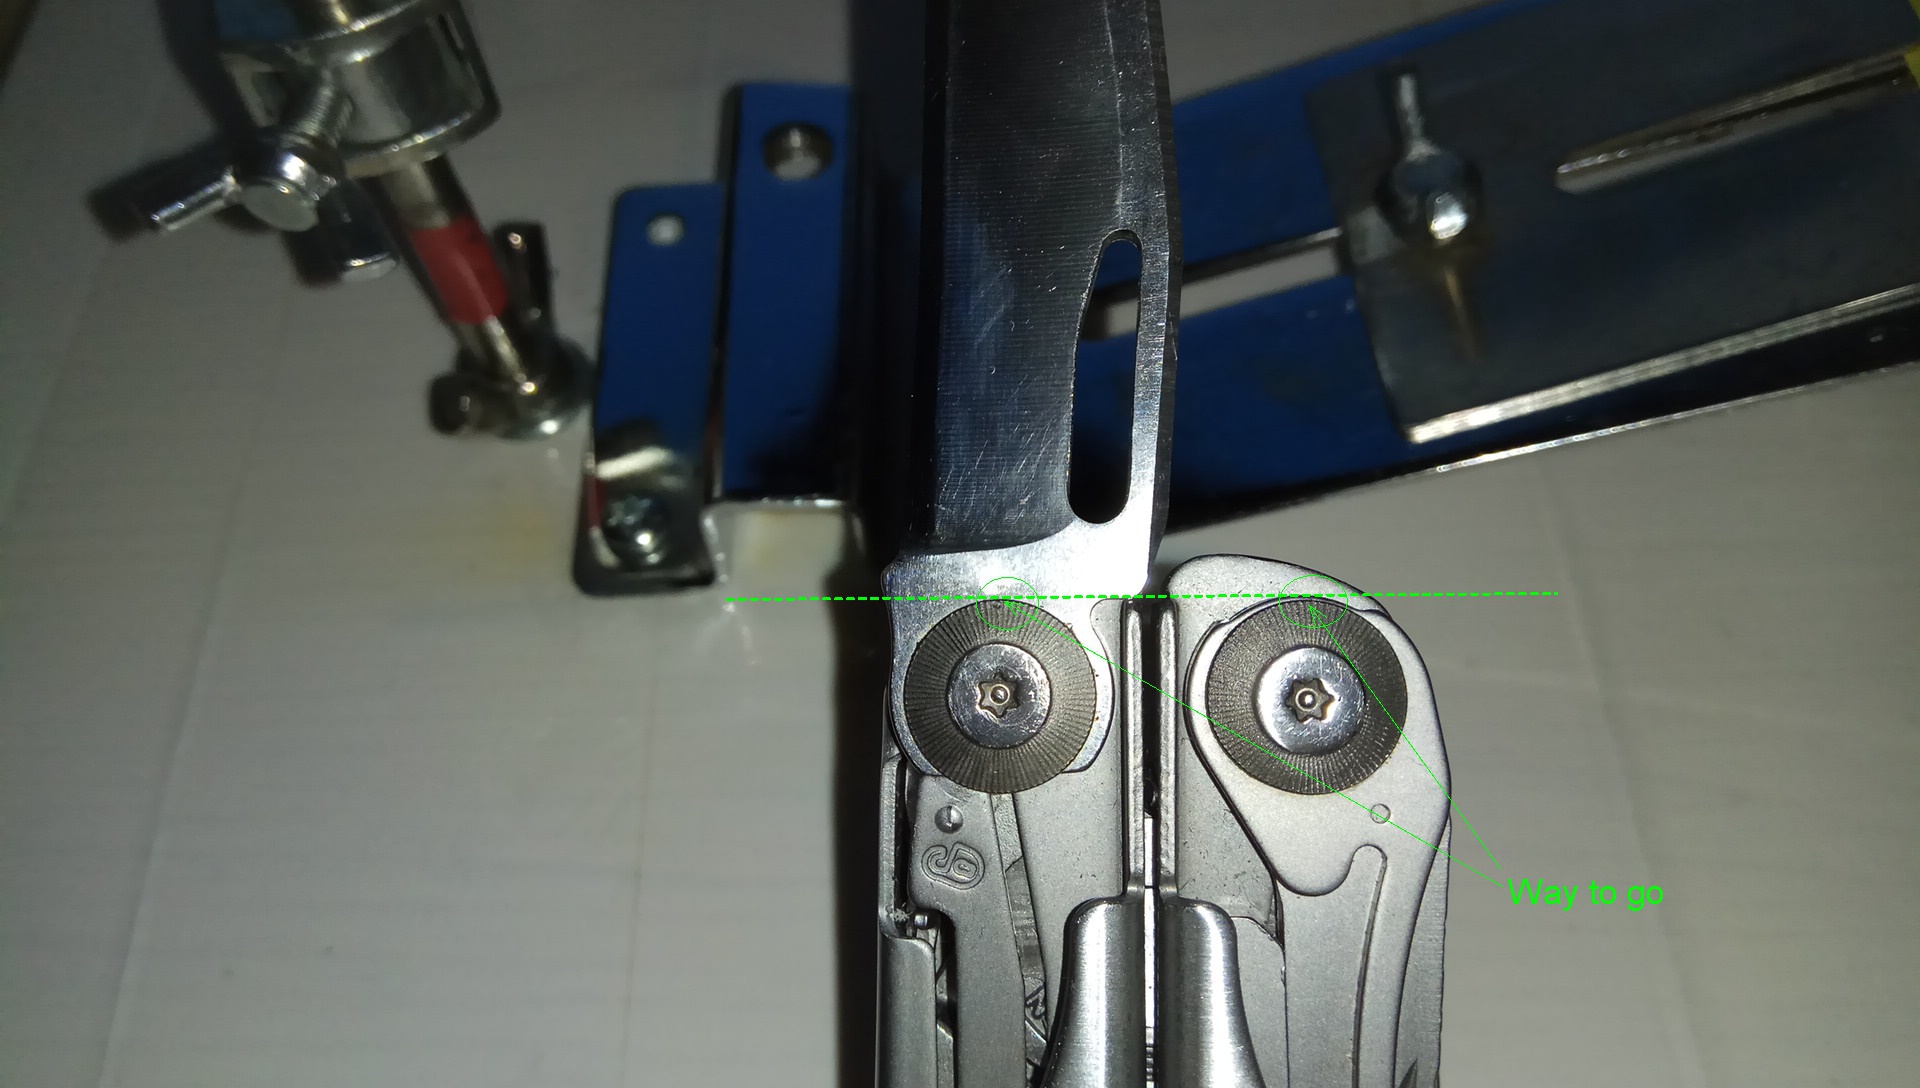
On the pics, it says "Way to go", but if you think about it, it is the only way to go and therefore a very lucky constellation in all regards:
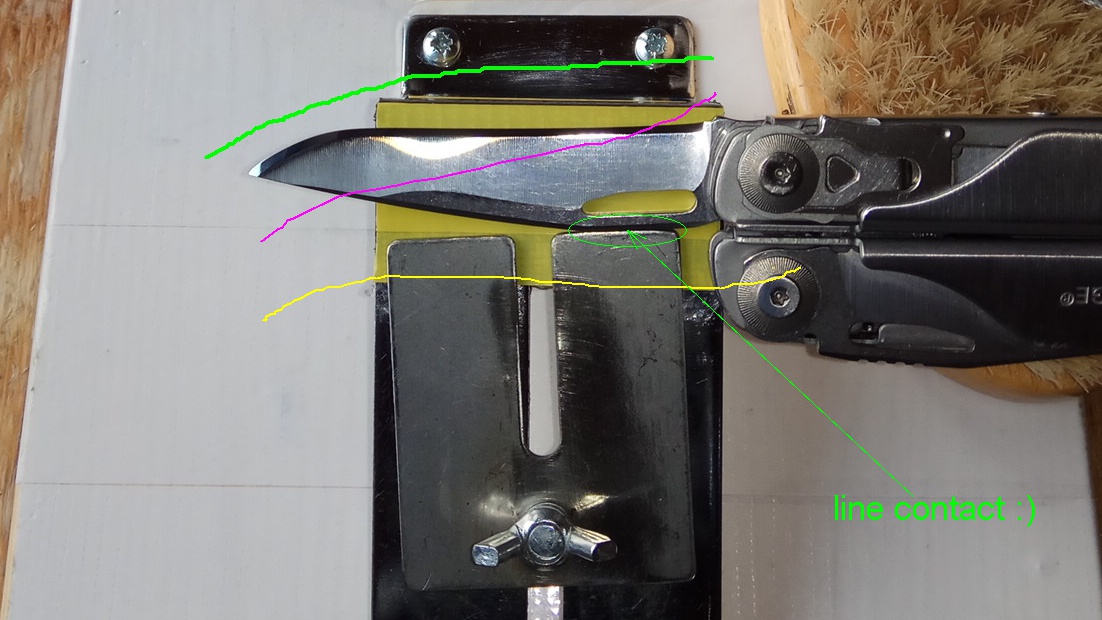
So what does the orientation of the blade look like, once the Surge gets stopped at the Ruixin frame? Well, in theory, it is impossible to sharpen a recurve, i.e. a concave edge, with a perfectly flat whetstone (see the yellow oriented imaginary edge line). That's why the resulting automatic orientation —slightly tilted counter-clockwise (see the purple oriented edge line)— is imho perfect enough, given the soft recurved(!) blade shape; the purple oriented edge line approximates the natural circular range of the guiding rod much better (compare with the green circular line). Now the Ruixin stainless steel plate can be moved up to support the blade position and stop the Surge from sliding down in the Y-direction; the user must align the SS plate in such a way that it establishes line contact with the spine of the Surge blade:
When we switch the blade side, we are learning about a potential asymmetry/problem: other elements/parts of the Surge would now serve as blade stopper (in the X-direction):
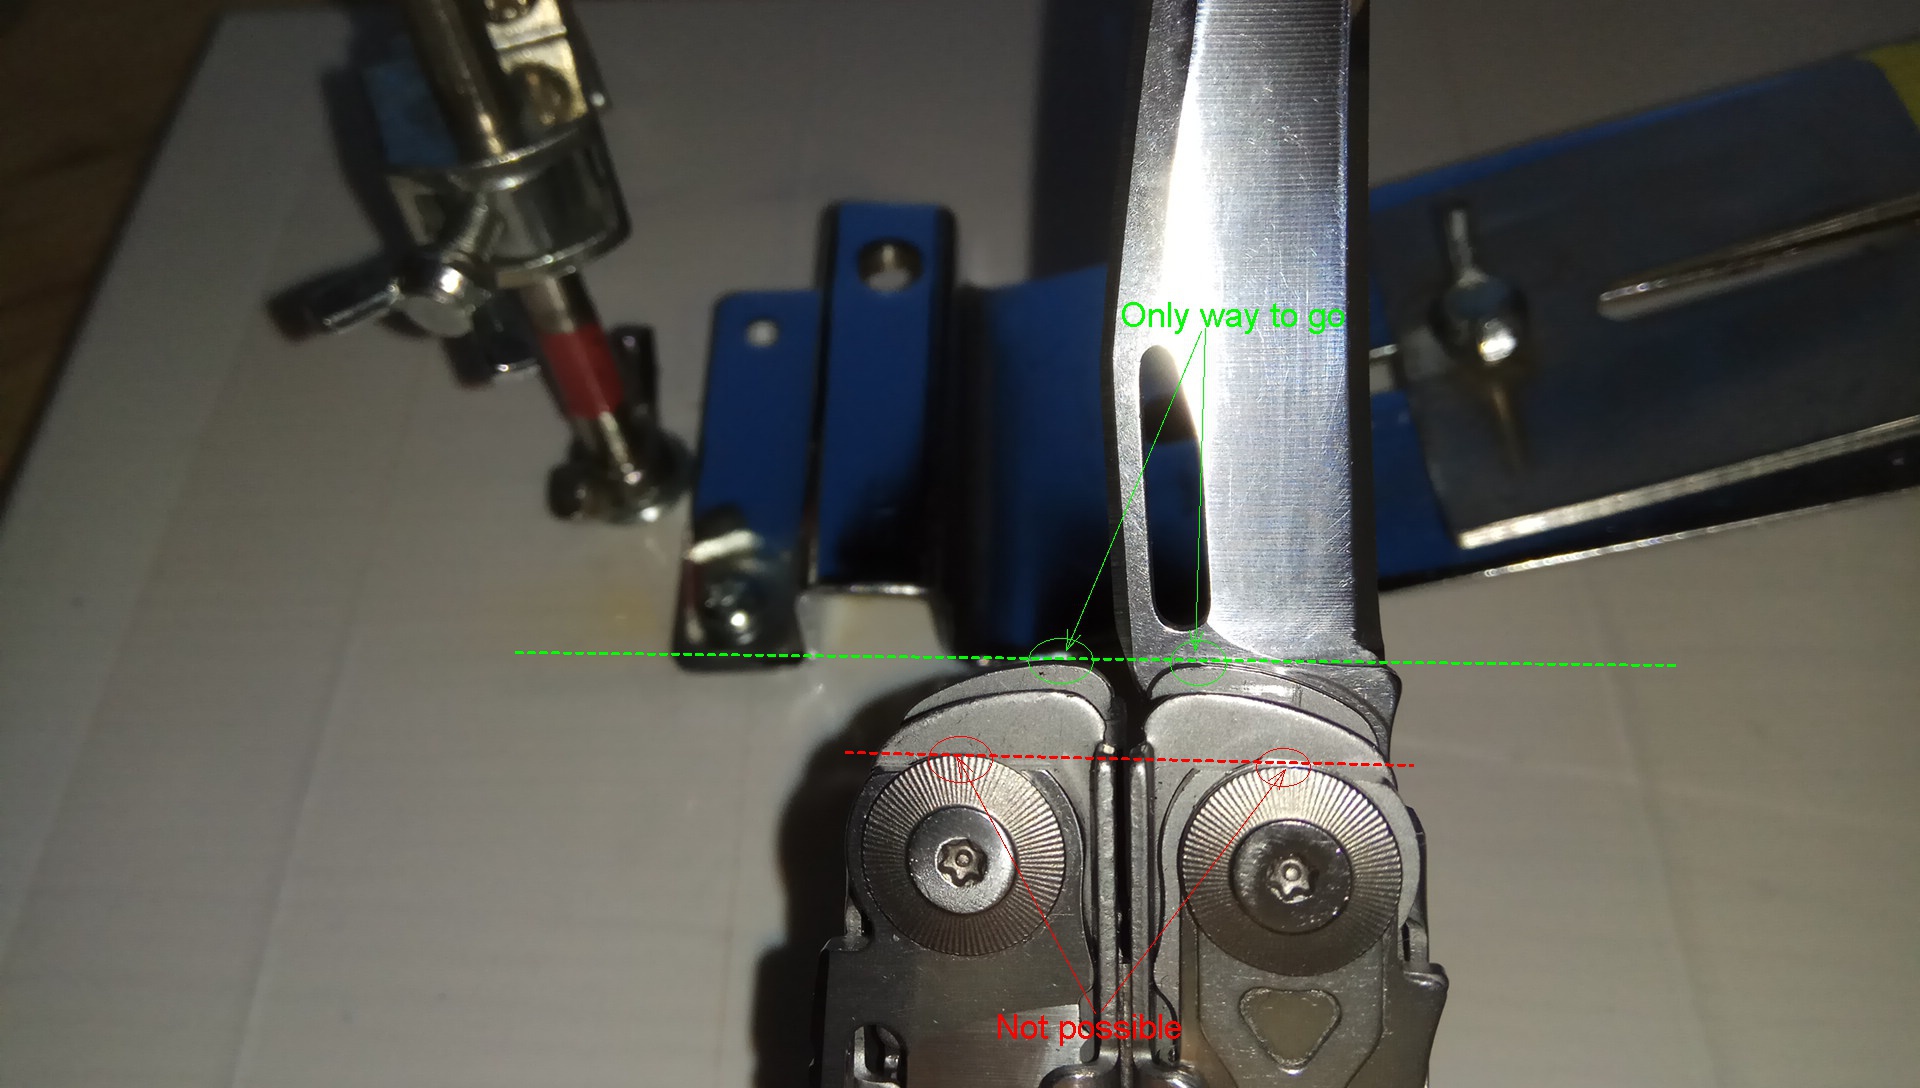
Once the Surge gets stopped by the Ruixin frame, less of the blade edge gets 'on top of the table top', by a few millimeters. It is simply "Not possible" to use the previous elements as blade stopper again:

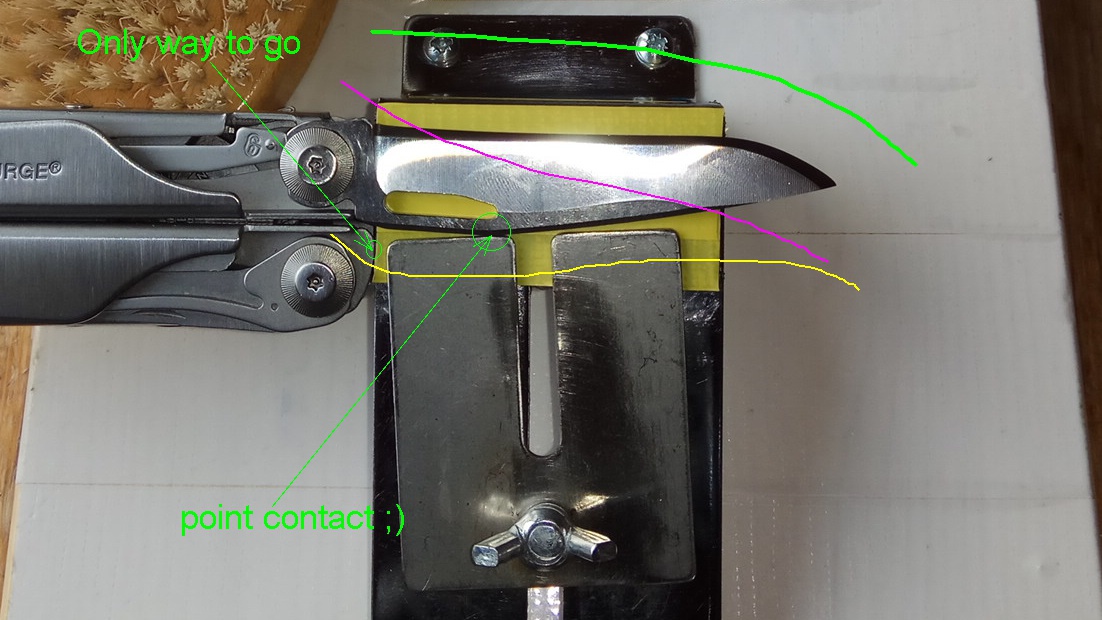
The difference of these few millimeters were the reason why months ago i had come to the (wrong) conclusion that the Surge edge had an asymmetrical grind (profile) from the factory, so i had to work with 2 different sharpening angles on the Ruixin to match the factory bevel exactly on either side. But by now i seem to have found 1 single median angle which produces a symmetrical-looking bevel on the Surge, lucky me! Maybe even luckier, the position of the previously fixed SS plate does not need to be changed at all: the Surge blade gets stopped (in the Y-direction) at the correct height, making point contact, and the orientation of the edge is again sloping correctly, naturally, slightly tilting clockwise. Note that the purple line is an exaggerated representation of the slightly tilted yellow line, just to make my point:
The following animated GIF illustrates how to setup the exact position of the SS plate, and it also proves that the SS plate does stay in 1 fixed position during the entire sharpening (and stropping) session on the Ruixin.
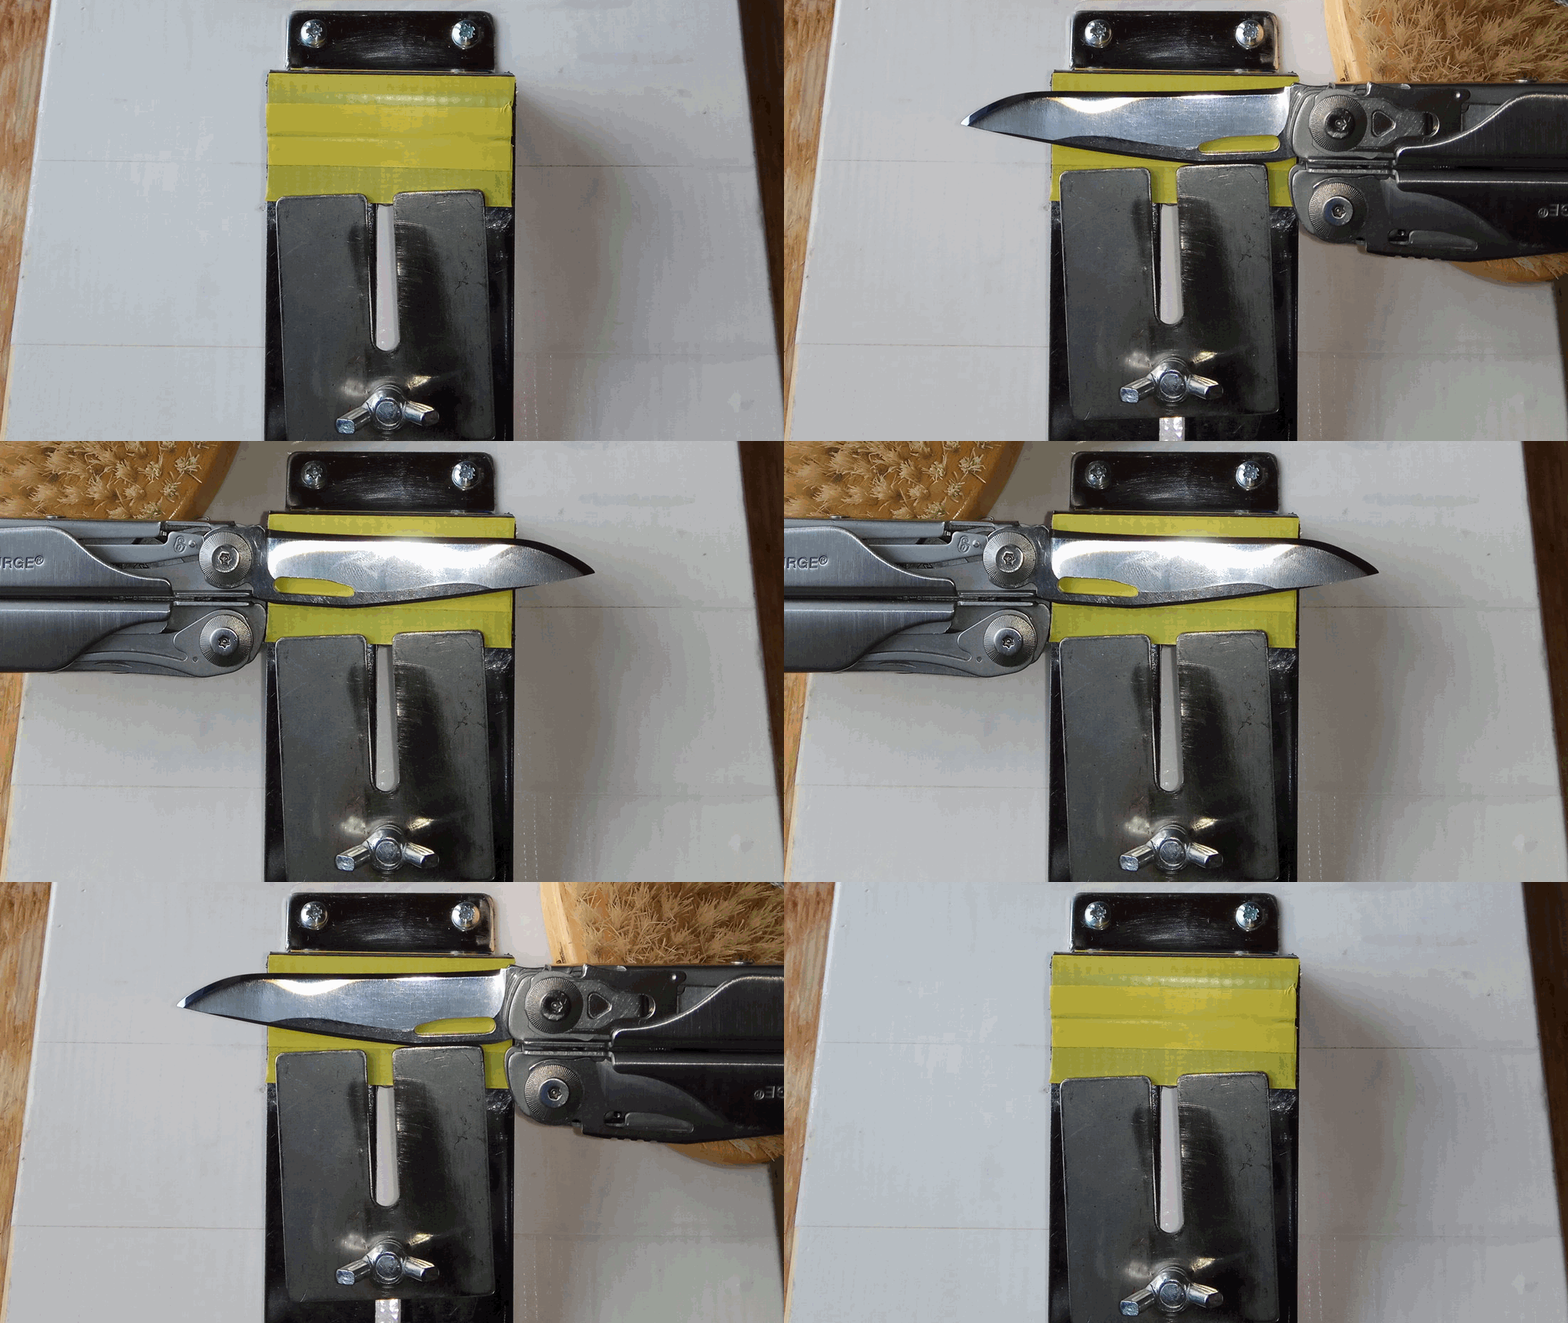
Note:[list type=decimal]* i would not disassemble the MT to remove a singular blade for sharpening. nobody does that. a factory can handle singular blade sharpening, the common user cannot.
- i will admit that the most efficient and recommended method of sharpening Surge is by way of the Spyderco Sharpmaker, still. however, i don't own one and a full set would cost me €€€ ouch no thanks. with my Ruixin i reach an absolutely precise geometrical edge (microscope) with the full bevel polished to any micron **without **convexing it. I will share later the secret how i do this efficiently and very budget-friendly, and it is maybe the key to success why i prefer and can recommend sharpening and stropping Spirit X and Surge on the Ruixin >:D
This week i am expecting an Aliexpress 949 shipment with replacement stones, i used up the 120grit and the 1500grit stones because of mal-usage (my bad :D). The set of 4 stones, hopefully original Ruixin quality, costs 6usd shipped incl tracking number. I will report if the set of stones are identical stuff.
1.5usd for 1 whetstone!
-
The summary of this longish post is: High-polish/Razorsharp-stropping can be done on the Ruixin (and similar guided rod sharpening systems) very precisely, effectively, conveniently/easily, and budget-friendly. Very budget-friendly. How? By applying the compound on surgical tape. The ("whetstone") base material should provide some yet minimal give. Here, balsa wood serves better than the typical leather.
Dec 2017 Reference, it is a world-premiere that someone on the WWW (forums, blogs, youtube) is presenting this method of stropping on a guided rod system. As you will realize, users of almost any commercial guided rod sharpening system could adopt my method; i am taking my modded Ruixin as application example. Afaik I am the first to have come up with this ingenious very specific idea and it is presented first here on MTF. Let's give this method a name and call it Paper Tape Stropping (by kreisler gemani) or 'to strop a knife/blade/edge with the PTS method' or 'to do PT stropping' :D.
Pro's:
-
very precise, effective, convenient, and budget-friendly way of stropping
-
very easy, also suitable for absolute beginners in the realm of stropping
-
grit progression possible, if wanted; also inexpensive
-
reliable reproducible results, perfect geometrical acuteness
-
can replace free-hand leather strops
-
goes easy on wrists, joints, muscles; it results painful to strop a Surge on leather :o
-
does not produce convex edge profiles; dulling over-stropping is not possible!
-
no strop cleaning/reactivation/maintenance needed; simply exchange the tape
-
typically the PTS "whetstones" are prepared fresh, pure, uncontaminated; one could reuse them
Con's:
-
may appear tiresome, time-inefficient, longer-taking, slower, less convenient than free-hand leather stropping
-
for starters, may take some pita time to deploy your guided rod system on the table desktop
-
may take some time to prepare your series of PTS "whetstones"
-
limited to the range/dimensions of knives which your guided rod sharpening system (GRSS) accepts
Note: The PTS method is *not *to replace *all *of your leather stropping activity, when working on a specific knife model or specimen. For example, after reducing the burr with my last Ruixin stone (1500grit), i sometimes proceed with 1min on my (singular grit!) 1 foot long SiliciumCarbide-loaded leather strop to *faster *smooth out the zig-zaginess of the edge line, before i return to the Ruixin device starting the PTS method. The PTS method does smooth out the edge line too, 100.0% perfectly so, it just takes longer. If time is not a factor, you won't need a leather strop during the entire sharpening procedure; however, in general a leather strop is always a great tool to have, for example for very quick, time-efficient touch-ups back to a working edge or when you don't mind convexing the edge profile a bit. I have been appreciating the PTS method so much that I always try to do it whenever a blade has gone dull and either would need touching up (usually done on a leather strop) or actual resharpening (usually done on a 1000+ grit stone). If you know what you're doing and have the proper set of compounds for the grit progression, then the PTS method can be extremely effective, hence also time-efficient.
Comparison: Stropping with disposable tapes is not a new idea per se. **WickedEdge **offers leather 'tapes' for 60$/pair, and **EdgePro **offers custom-cut grit tapes for 37$/set. If money isn't a factor, then these are awesome substitutes and superior to my PTS which is basically a budgeteer's DIY method. WickedEdge and EdgePro owners don't need to look any further, they already have the best (and most expensive). At the opposite end of the spectrum, people on a budget or Ruixin users should find my PTS method to be an attractive alternative to free-hand leather stropping.
What you will need: [list type=decimal]
-
1pc compatible base/holder; i use the cheap generic black plastic ones
-
1pc balsa wood, cut to the identical dimensions of your Ruixin stone
-
double-sided adhesive tape or special glue to fix the wood on the base
-
1 roll of surgical paper tape 3M Micropore; for best guaranteed results don't use any other product!
-
1 set of cheap stropping compound; typically in form of solid wax, block, cream, paste, powder
-
leather oil or other light oil for solving and dispersing your preferred stropping compound
-
(optional) 1 pair of disposable rubber gloves; i don't use such a thing anymore, they are not really needed
-
(optional) old newspaper to protect your desktop from spills, crumbs, dirt
If you have a set of 3 solid wax compounds (FINE, SUPERFINE, SUPEREXTRAFINE), then it'd make sense to get 3pcs of the plastic base and attach balsa wood on each one of them. The wood doesn't get dirty or consumed, and base and wood together form the "holder" for the paper tape. The more holders you have, the better for you: you could reuse the holder with the FINE PT (=paper tape loaded with the FINE compound) for other knives and wouldn't need to exchange the tape for the grit progression.
On the following pic you can see a total of 2pcs black plastic bases (1 blank, 1 in use), 3pcs balsa wood (2 not in use, 1 in use), 2pcs leather strips (both not in use), 1 roll of 3M Micropore, 1 set of solid wax compound BLUE and WHITE (made in gemani), 1 set of 12 syringes colorful polishing diamond paste (made in chinas, 1 syringe missing), 1 container of pure ChromeOxide GREEN powder, 1 syringe GERMAN stropping paste (SiliciumCarbide), 2 mini glass bottles (water, oil), 1 yellow bottle with leather oil (made in gemani):

**Chinese (CN) diamond paste **can be found easily in sets of 3, 5, 6, 10, or 12 syringes on ebay, Aliexpress, BG, etc, etc. 1 set costs maybe 6usd. CN diamond paste is for polishing metals and, due to its low(?) concentration of abrasives, not suitable or not very effective as stropping compound applied on leather: on a dry leather surface the creamy paste instantly turns waxy/solid rather than remains oily. Since, applied on leather or directly on wood, it didn't seem to cut steel effectively, I hated this paste … until i applied it on the paper tape. As you can see from the above photo, the (generously loaded) tapes turned black, the CN paste did its work, finally! And surprisingly fast! Now i am loving the CN paste and have almost used up the more 'popular' colors. My set of CN paste goes down to 0.5micron, other CN paste sets go down to 0.25micron. My ChromeOxide GREEN is said to be 0.3micron, here my razor-sharp kitchen chef knife finished with it (the upper knife is for edge reference
 ):

It took a long time :o to go through the full range of grit progressions of the CN paste, finishing with the ChromeOxide GREEN, and i wouldn't want to do it again in future, except for show edges like my multitool blades. ChromeOxide or "the GREEN compound" seems to be the most popular stropping compound on youtube, and youtubers end up with armhair-shaving sharp edges. One geman youtuber recommended buying the GREEN compound in waxfree form, in its pure form, powder, which i did:

Really inexpensive, 2eur or so from the local painter's supply shop. Hilarious, it is sold in stupid plastic bags. Can you see what i did there? I feel like genius lol :D:

At first i didn't have 3M Micropore surgical tape in the household. Instead i found other make surgical tape, you may know the series "Leukoplast, Leukosilk, Leukotape" from your last hospital visit. Anywho, even though this other surgical tape worked very well for stropping, it didn't work extremely well. Do not use this kind of surgical tape:

Another poor idea is applying compound directly on a whetstone, with or without oil doesn't matter
:

Yes real whetstones or glass are perfectly smooth but they don't provide the minimal give which is desirable for effective stropping. Balsa wood or leather are superior in this regard. Thus, also a poor idea is using a real whetstone (artificial or natural doesn't matter) as "holder" for the tape:

Another advantage of using balsa wood as holder is that you won't damage (micro-chip) the edge when you accidentally hit the "whetstone" against the knife edge. The knife edge would cut into the soft wood and not take any damage. Accumulation of such cutting mishaps is the only reason why one would need to replace the strip of balsa wood eventually. Check out the four corners, you could see 2 corners with damaged wood underneath the tape:

So yeah i tried various tape products. Being absorbent, surgical tapes are the ones we're looking for. Among them the #1 best choice is the **surgical paper tape. And the market-leading surgical paper tape is made by 3M, and their product is called 3M Micropore. If bought from a local pharmacy via the PZN identification, it is expensive stuff, maybe 6EUR per roll. I found it on amazon, a 12-pack box for 9EUR shipped. Each roll has 2.5cm x 9.1m, what a steal:

With the 12 rolls à 9.1m one could build hundreds of Apex-sized paper tape strops. For sure it is an economic no-brainer to exchange the tapes frequently, regularly, as soon as they have turned black:

How to prepare a PTS "whetstone":
Assuming that you've already attached the wood on the plastic base, there are 3 steps:[list type=decimal]* Apply a strip of paper tape on the balsa wood holder
-
Place 3 oil drops on the dry tape (1 near either end and 1 in the middle) and rush to disperse the soaking oil evenly over the entire tape
-
Place "crumbs" of your compound on the (now slightly oily) tape and disperse them with your bare index finger through rubbing motions; the entire tape should be loaded with the compound evenly
-
(optional) If the loaded tape is too dry, then no good. If the loaded tape is too wet from the oil, then also no good. In the latter case, game over, remove the tape and try again. In the former case, place 1 oil drop on the tip of your index finger and rub the finger across the tape to "moisturize" the surface.
Step1 is banal. You will notice that the adhesive of the 3M Micropore product sticks pretty well to the smooth balsa wood surface, so be careful later, when you replace the tape, and also remove adhesive residues with a paper towel plus some rubbing alcohol or oil. Remind yourself that the surface should be smooth when you apply the tape.
Step2 is for pre-saturating the tape and evenly so. The oil (personally, i use leather oil and never tried stuff like Ballistol or WD-40 for this purpose) acts as solvent for the compound, no matter if the compound is in solid wax form, block form, cream form, paste form, or dry powder form.
Step3 is where you try to create an evenly loaded stropping surface with your bare index finger. It is obvious that cream and pastes are the most convenient forms for this little task and don't need further How To explanation. See the remainder of this post how i manage to apply solid block compound.I use an old knife to scrape flakes from the block compound. One does not need much. Both flake piles are way too much:


Oil does solve the flakes and liquefies them. A few drops of oil on the pile and some rubbing action with your finger and you've created a DIY paste. In the following pic i used too much oil, no good:

The following pic shows how i experimented with applying the DIY paste on dry tape. No good because you're losing control over the amount of oil getting absorbed by the tape:

Let's do it the correct way, shall we? Step1 is applying a strip of paper tape on the balsa wood. Note that i am using used wood, not brand-new fresh stock wood. As long as the wood surface is smooth, flat, plane, and undamaged (material consistency), it doesn't matter. The wood only serves as "holder" for the tape. The tape does the stropping, not the wood:

After Step2 the tapes look a bit wet or "moisturized". Important, use as little oil as possible. 1-2 drops of oil should suffice:

For Step3 i've produced more flakes than needed. My scraping tool is a scrap piece of hard plastic lol:

This is how it's done, correctly! You disperse the "crumbs" (here: flakes) rather generously over the tape, like so:

Then use your bare index finger to rub the crumbs into the tape. You'll be surprised how the rubbing motion plus the oil in the tape dissolve the solid flakes and how easy it is to spread the compound evenly over the tape surface, like so:

Now you're ready to go. If you think that the loaded surface seems a bit dry, don't worry; when needed, you could place 1 oil drop on the tip of your index finger and then either dab the minimal amount of oil on the (blackening) tape or directly on the knife edge.
The following 7 pics document how the tape gets loaded with powderized knife steel. Depending on your wrist movement and pressure balance, a black pattern would form on the tape. After switching blade sides and also 180°-turning the "whetstone", the tape would become fully covered with the black stuff. The WHITE compound cuts very fast and produces a near-mirror polish after a few strokes. Micro-nicks, micro-chips are gone in no time:


Moving on to the BLUE compound. It also cuts very fast and leaves a mirror polish. The high concentration of abrasives (3micron? i dunno) makes the compound so fast-cutting:


The duo of WHITE plus BLUE compound costs 5EUR or so and is for polishing metals. But they are so fast-cutting, much faster than the CN diamond paste, that they have become my go-to standard method for finishing the sharpening of my knives (and also for resharpening, instead of going back to the 1000+ grit stones). Sometimes i would add a 3rd stropping step with the GREEN compound. For sure, for me, the PTS method gives me a more perfect stropping result along the **entire **edge, on **either **blade side!, than when i try my best doing free-hand stropping where I always struggle with the rounded portions of the knife ("belly"). I was happy with my budget free-hand leather stropping and results before, but the PTS method took the sharpening results to a higher level. A real win and worth composing this time-consuming reference post.
What i also like about balsa wood as holder: Even though the material is soft and could be damaged/dented easily during non-careful handling, the wood stays smooth, flat, plane and does not get dented or compressed through the stropping action itself. Maybe that's because no pressure is needed during the paper tape stropping: the (generously loaded) paper tape does all the stropping work, acting like a mechanical shield, there is not much strain left on the balsa wood itself. I can tell you, stropping on balsa wood direct consumes the material, whereas paper tape stropping spares the wood material!
Guided stropping is highly effective resulting in hair-whittling sharpness, WickedEdge and EdgePro 1003 owners know it, and with this post I've shown how one can get there on a budget. The essential key was using 3M Micropore (this very product!) on balsa wood, and not loading a whole bunch of balsa strops with an entire set of forbiddingly expensive diamond sprays

-


Hello! It looks like you're interested in this conversation, but you don't have an account yet.
Getting fed up of having to scroll through the same posts each visit? When you register for an account, you'll always come back to exactly where you were before, and choose to be notified of new replies (either via email, or push notification). You'll also be able to save bookmarks and upvote posts to show your appreciation to other community members.
With your input, this post could be even better 💗
Register Login



