Skip to content
  • Categories
  • Recent
  • Popular
  • World
Skins
  • Light
  • Dark

Collapse

NodeBB

Re: First mod - mini Farmer with scissors

Scheduled Pinned Locked Moved The Mod Squad
59 Posts 1 Posters 40.4k Views
  • Oldest to Newest
  • Newest to Oldest
  • Most Votes
Reply
  • Reply as topic
Log in to reply
This topic has been deleted. Only users with topic management privileges can see it.
  • H
    H
    harryf3
    wrote on last edited by
    #1

    Here we go.
    Here are my basic modding tools.

    A friend has a lathe so we made two rivet tools.

    The first donor is a “my first victorinox”. Dismantling
    .

    Making a starting hole with the awl of the soldier.

    Drilling

    There is a proper hole on the teflon working surface to accept the other side of the rivet.

    Punching

    The head of the pin appears

    Taking the pin out with the pliers.

    Here is the last pin. All it needes is to file the head and punch it

    Here are the parts

    A drawing helps so we know what goes where.

    Preparing a few pins

    1 Reply Last reply
    0
    • H
      H
      harryf3
      wrote on last edited by
      #2

      I made a test with the scales of a cheap Bantam to see how the rivet tools work.

      I painted the scales with a permanent marker so I could see any little scratch.

      Works great but it’s very difficult to hold the scales parallel to the ground and give precise hits with the hammer.
      Those tools need a press so I decided not to use them.
      I tried to use only one and put the scales on a anvil with a hole but it’s also difficult.
      I had to hit strongly with the hammer and the scales were in danger. So I gave up the idea of the rivet tools.

      For practice I made a Lumberjack.

      1 Reply Last reply
      0
      • H
        H
        harryf3
        wrote on last edited by
        #3

        Dismantling the new orange Cadet.

        I do not have a pillar drill so I used the hole of a small cutter as a guide. We do not want the drill to slip and hurt the alox scales.

        Punching

        Cadet no more. Now there is no turning back.

        1 Reply Last reply
        0
        • H
          H
          harryf3
          wrote on last edited by
          #4

          Making an awl from the nail file.

          Removing much metal with the wannabe dremel to give the basic shape of the awl.

          Filing

          Sharpening with a DC4

          This is it. A combo awl / nail file.

          Preparing the 3 brass pins with my old trusty american ball peen hammer and a vice.

          1 Reply Last reply
          0
          • H
            H
            harryf3
            wrote on last edited by
            #5

            The discontinued small Climber with scissors arrived and we are back in business.
            I’m afraid that the SAK collectors will not appreciate the dismantling of a discontinued and collectible SAK but I do need the scissors so please I need your understanding.

            A fistful of parts.

            Nice and neat so we know again what goes where.

            A drawing is always better that a picture because two backsprings are almost identical.

            Here are the drawings of the Cadet and the test-Lumberjack.

            Too many parts.

            The “small Climber” was well used and some backsprings, liners and tools were dirty or scratched but the green compound will polish them.

            Like new

            1 Reply Last reply
            0
            • H
              H
              harryf3
              wrote on last edited by
              #6

              Assembling.

              First I used the scales of the Bantam to see if everything is working nice, tight and smoth and if I used the right liners.
              I used a jig.
              Inserting the backsprings, layers and tolls one by one.

              The pliers help to open the backspring. The liners are aluminium so they are soft and it’s very easy to hurt them so I protected them with a sponge.

              Everything looks and works fine so we can now tranfer everything to the orange scales.

              1 Reply Last reply
              0
              • H
                H
                harryf3
                wrote on last edited by
                #7

                Orange scales

                I cannot use the jig anymore because I have 3 pins ready with round heads.

                I found that it’s very easy to put everything in place without a jig or pliers.
                All we have to do it to hold the tool, raise the tip and push the backspring at an angle at the same time. It’s really too easy.

                So let’s assemble the new and final orange SAK.

                Ready but not pinned.

                The tape holds tight eveything in place so the knife will not explode during the pinning/riveting process.

                1 Reply Last reply
                0
                • H
                  H
                  harryf3
                  wrote on last edited by
                  #8

                  Those magical little stickers in layers of 6 or 7 will prevent the scales from the hammer.
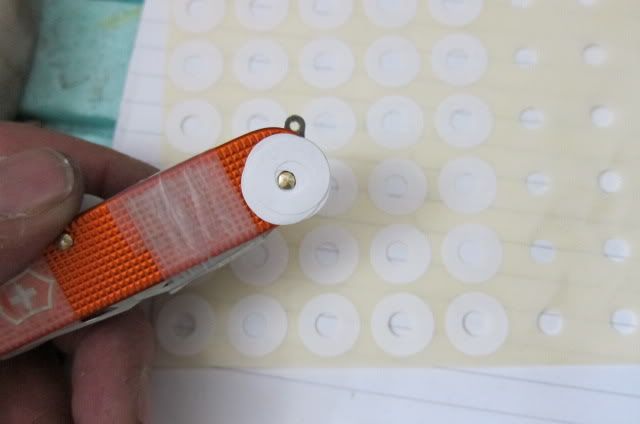
                  The exposed pin must have the correct size and be even (not pointy).

                  Or we can use a piece of leather or an elastic tube from bicycle tyres.
                  I stole this great idea from mister Desax who used rubber pieces..

                  I made a small round hole on the vice. This will be my bucking bar.
                  Backup is everything when riveting.
                  The head will take the shape of the hole in the backing bar no matter what.
                  Needless to say that I covered with the stickers BOTH sides of the pin or the vice will hurt the scales.

                  You already know the result from the first post.

                  I could avoid a few steps of the above but this was my first MOD and it was a complicated one.
                  I think it’s obvious which steps were not necessary.

                  I hope you found this useful and interesting.
                  Thanks for looking
                  Aris, Greece

                  1 Reply Last reply
                  0
                  • H
                    H
                    harryf3
                    wrote on last edited by
                    #9

                    A quick note.
                    Looks like 1.3 mm was too much for the exposed pin to form a head.
                    So I over-hitted with the hammer to make the knife tight and the heads of the pins on the backside of the SAK cracked a little.
                    Continuous hitting creates brass-dust and cracks.

                    1 Reply Last reply
                    0
                    • Sparky415S
                      Sparky415S
                      Sparky415
                      wrote on last edited by
                      #10

                      Aris/Harry
                      Thank you very much for all the pictures :salute: and I really like the look of those rivet tools :drool:

                      Very nice work :cheers:

                      1 Reply Last reply
                      0
                      • D
                        D
                        Doctor.Skipper
                        wrote on last edited by
                        #11

                        harryf3:
                        Well, well done - absolutely amazing course! :salute: :tu:
                        I have never seen so clear "evolution" of the knife modding.

                        1 Reply Last reply
                        0
                        • nuphoriaN
                          nuphoriaN
                          nuphoria
                          Admin Team
                          wrote on last edited by
                          #12

                          Excellent photos essay - I vote we make it a sticky 😄

                          1 Reply Last reply
                          0
                          • GarethG
                            GarethG
                            Gareth
                            Admin Team
                            wrote on last edited by
                            #13

                            great pics mate, cheers for sharing. :cheers:

                            1 Reply Last reply
                            0
                            • M
                              M
                              MultiMat
                              wrote on last edited by
                              #14

                              harry , that is ............ just wow ......... wow :salute: :salute: :salute:.

                              I would love to see a video of the final peening of the pins, that would be very cool , I have looked on Youtube with no luck.

                              Getting the peening just right so the tightness in the SAK is spot on has to be tricky :think: :think: :think:.

                              GREAT photos , GREAT project & GREAT SAK mate 😎 😎 😎 😄 😄

                              1 Reply Last reply
                              0
                              • enki_ckE
                                enki_ckE
                                enki_ck
                                Global Moderators
                                wrote on last edited by
                                #15

                                @nuphoria said:
                                Excellent photos essay - I vote we make it a sticky 😄

                                +1 and maybe add it to the main site and the SOSAK in the next newsletter too.

                                Great work. Inspired me to try the same.

                                1 Reply Last reply
                                0
                                • H
                                  H
                                  harryf3
                                  wrote on last edited by
                                  #16

                                  Thank you for your kind words ladies and gentlemen.
                                  I’m very glad that you found my thread useful.

                                  This is a how we set a rivet and make the head round.
                                  Remember: BACKUP IS EVERYTHING.

                                  And some very useful reading:

                                  http://www.thefullwiki.org/Rivets

                                  http://www.iknifecollector.com/forum/topics/modifications-personalizing?groupUrl=kniferepairrestorationupgradegroup&id=3181080:Topic:107283&groupId=3181080:Group:103562&page=6#comments

                                  http://www.bladeforums.com/forums/showthread.php/701748-Sharp-edges-on-peened-rivets

                                  http://www.homemodelenginemachinist.com/index.php?topic=4335.15

                                  http://www.mtfca.com/discus/messages/80257/82578.html?1235094026

                                  http://www.hellboxarmory.com/mm5/merchant.mvc?Screen=PROD&Store_Code=HBA&Product_Code=AKRFS&Category_Code=AKtools

                                  http://www.snydersantiqueauto.com/modelaparts/rivetsrivettools

                                  The Advanced Knife Makers Manual

                                  I may make a black alox farmer with scissors for a friend next month and I’ll try to focus on details about riveting.
                                  This is the most difficult part when customizing an alox SAK.
                                  All the other steps are quite easy and all we have to do is to be methodical.

                                  To be honest I’m not very satisfied with the rivets on the orange mini farmer of this thread. Experience is something we cannot buy. I hope my next project will be better.

                                  All the best
                                  Aris

                                  1 Reply Last reply
                                  0
                                  • D
                                    D
                                    Doctor.Skipper
                                    wrote on last edited by
                                    #17

                                    Very useful links and information!
                                    Many thanx - I would need just it!

                                    Doc.Skipper

                                    1 Reply Last reply
                                    0
                                    • W
                                      W
                                      Woz
                                      wrote on last edited by
                                      #18

                                      Great work! I'm not talented enough to build my dream SAK, but maybe sometimes I will have one modded by a gifted modder like you. Very nice!

                                      1 Reply Last reply
                                      0
                                      • H
                                        H
                                        harryf3
                                        wrote on last edited by
                                        #19

                                        A very simple turorial with animation. Press the yellow button.

                                        http://hognosesam.co.uk/JoiningMetalsRivets.aspx

                                        1 Reply Last reply
                                        0
                                        • GarethG
                                          GarethG
                                          Gareth
                                          Admin Team
                                          wrote on last edited by
                                          #20

                                          I hope you don't mind Aris, but the rest of the mods and I felt there was some excellent info on page 2 and 3 of your thread so we decided to make it a 'sticky'. :cheers:

                                          1 Reply Last reply
                                          0

                                          Hello! It looks like you're interested in this conversation, but you don't have an account yet.

                                          Getting fed up of having to scroll through the same posts each visit? When you register for an account, you'll always come back to exactly where you were before, and choose to be notified of new replies (either via email, or push notification). You'll also be able to save bookmarks and upvote posts to show your appreciation to other community members.

                                          With your input, this post could be even better 💗

                                          Register Login

                                          • Login

                                          • Don't have an account? Register

                                          • First post
                                            Last post
                                          0
                                          • Categories
                                          • Recent
                                          • Popular
                                          • World