
Skip to content
Collapse
? [[global:guest]]
Unread Recent
HOME SEARCH PROFILE NOTIFICATIONS 0 MESSAGES 0 BOOKMARKS MEMBERS BADGES
Multitool.Org Forum
MultiTool.org • Community Header Space • Watch This Space

And so it begins.... (My adventures into Alox!)

Scheduled Pinned Locked Moved The Mod Squad
6.0k Posts 1 Posters 1.3m Views
  1. Home
  2. Tool Talk
  3. The Mod Squad
  4. And so it begins.... (My adventures into Alox!)
And so it begins.... (My adventures into Alox!)
  • Oldest to Newest
  • Newest to Oldest
  • Most Votes
Reply
  • Reply as topic
Log in to reply
This topic has been deleted. Only users with topic management privileges can see it.
  • 82brutus Offline
    82brutus
    Posts: 968
    82brutus Offline
    82brutus
    wrote on last edited by
    #1 Quote Reply

      Very nice. Good pictures! Look forward to seeing more. :cheers:

      1 Reply Last reply
      • nuphoria Offline
        nuphoria
        Admin Team
        Posts: 15,038
        nuphoria Offline
        nuphoria
        Admin Team
        wrote on last edited by
        #2 Quote Reply

          Good stuff. Where did you get the little hex/torx head pins?

          1 Reply Last reply
          • Syph007 Offline
            Syph007
            Global Moderators
            Posts: 9,842
            Syph007 Offline
            Syph007
            Global Moderators
            wrote on last edited by
            #3 Quote Reply

              @nuphoria said:
              Good stuff. Where did you get the little hex/torx head pins?

              Those were from knifekits.com All 1/8 inch so lots of drilling out of components to do still.

              These are the pivots: http://www.knifekits.com/vcom/product_info.php?cPath=60_83&products_id=471

              And the screws: http://www.knifekits.com/vcom/product_info.php?cPath=60_81_230&products_id=1248

              1 Reply Last reply
              • tattoosteve99 Offline
                tattoosteve99
                Posts: 6,326
                tattoosteve99 Offline
                tattoosteve99
                wrote on last edited by
                #4 Quote Reply

                  Can't wait to see!

                  1 Reply Last reply
                  • MadPlumbarian Offline
                    MadPlumbarian
                    Posts: 38,623
                    MadPlumbarian Offline
                    MadPlumbarian
                    wrote on last edited by
                    #5 Quote Reply

                      keep it going, keep us posted!! JR

                      1 Reply Last reply
                      • Mr. Whippy Offline
                        Mr. Whippy
                        Posts: 12,208
                        Mr. Whippy Offline
                        Mr. Whippy
                        wrote on last edited by
                        #6 Quote Reply

                          That vise is pure genius!

                          Your first Alox mod is short a few tools... :pok:

                          I'm impressed AND inspired (I have a couple of bodged up 58 mm alox tools that need their rivets drilled out... :()

                          1 Reply Last reply
                          • Syph007 Offline
                            Syph007
                            Global Moderators
                            Posts: 9,842
                            Syph007 Offline
                            Syph007
                            Global Moderators
                            wrote on last edited by
                            #7 Quote Reply

                              @Mr. Whippy said:
                              Your first Alox mod is short a few tools... :pok:

                              Ya but this is the ultra lite poser version... safe to take on airplanes too!

                              1 Reply Last reply
                              • tattoosteve99 Offline
                                tattoosteve99
                                Posts: 6,326
                                tattoosteve99 Offline
                                tattoosteve99
                                wrote on last edited by
                                #8 Quote Reply

                                  @Syph007 said:

                                  @Mr. Whippy said:

                                  Your first Alox mod is short a few tools... :pok:

                                  Ya but this is the ultra lite poser version... safe to take on airplanes too!

                                  Good luck on getting anything on a airplane nowadays. You can't even have nail clippers :twak: I'm getting one of those cross slides myself this year. Great pics btw. Keep up the great work!

                                  1 Reply Last reply
                                  • Sparky415 Offline
                                    Sparky415
                                    Posts: 13,000
                                    Sparky415 Offline
                                    Sparky415
                                    wrote on last edited by
                                    #9 Quote Reply

                                      @82brutus said:
                                      Very nice. Good pictures! Look forward to seeing more. :cheers:

                                      Great job :tu:

                                      1 Reply Last reply
                                      • bushidomosquito Offline
                                        bushidomosquito
                                        Posts: 660
                                        bushidomosquito Offline
                                        bushidomosquito
                                        wrote on last edited by
                                        #10 Quote Reply

                                          Are you drilling the back springs and center holes of the scales 1/8" too? I think it thins that bump area in the springs just a tad too much plus it's a real pain to drill compared to the blades so I'm using a floating pin (HSS drill rod) of the stock pin diameter in the center from now on. When I make scales from ti or brass I only drill center holes 2/3 of the way through from the inside of the scales. This pin is all shear, no torque so it's just there as a fulcrum for the springs. The same could be done with Alox scales if you found an attractive way to plug the center holes. Maybe drill the countersink into a counterbore and press something into it.

                                          1 Reply Last reply
                                          • Syph007 Offline
                                            Syph007
                                            Global Moderators
                                            Posts: 9,842
                                            Syph007 Offline
                                            Syph007
                                            Global Moderators
                                            wrote on last edited by
                                            #11 Quote Reply

                                              @bushidomosquito said:
                                              Are you drilling the back springs and center holes of the scales 1/8" too? I think it thins that bump area in the springs just a tad too much plus it's a real pain to drill compared to the blades so I'm using a floating pin (HSS drill rod) of the stock pin diameter in the center from now on. When I make scales from ti or brass I only drill center holes 2/3 of the way through from the inside of the scales. This pin is all shear, no torque so it's just there as a fulcrum for the springs. The same could be done with Alox scales if you found an attractive way to plug the center holes. Maybe drill the countersink into a counterbore and press something into it.

                                              Ya I was thinking something similar. Its a nicer look if the scales are all custom, but since im using the alox scales im not sure what to use in the center pin on the outside of the scale to make it look the same as the others. I'll test it the way I have it now as I think it will be fine, there is still 1 mm of steel in the hump after I drilled it through, but ya it's tight tolerance for sure.

                                              1 Reply Last reply
                                              • Syph007 Offline
                                                Syph007
                                                Global Moderators
                                                Posts: 9,842
                                                Syph007 Offline
                                                Syph007
                                                Global Moderators
                                                wrote on last edited by
                                                #12 Quote Reply

                                                  I got some more time to work, so I kept taking pics as I went.

                                                  I ripped apart more knives. Some red scales this time! I can do a total teardown in about 10 minutes now that I have the technique down.

                                                  All of the springs and components have been drilled out to 1/8 inch now. Here I show test fitting the pivot pin.

                                                  I had to countersink the scale holes a bit so the screws would sit flush.

                                                  Here is my awesome technique for hole sanding. Roll up sandpaper, insert in drill, sand!
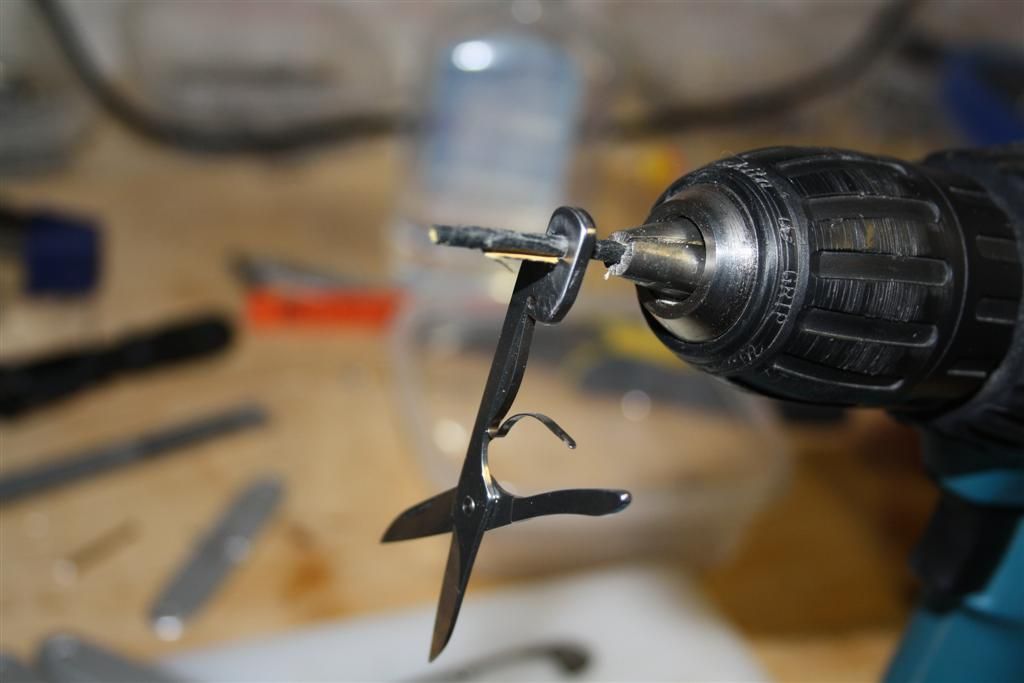
                                                  Test fitting the springs together with the pins. The hump has thinned but I think there is plenty of metal left. Time will tell.

                                                  The biggest pain for me was cutting down the pivots to the exact right length, fiddly work. Here are the springs again with correct length pivot.

                                                  That's all for now, I got burgers on the grill, but I'm going to do a test fit together after dinner so I will post more pics of how it goes.

                                                  1 Reply Last reply
                                                  • Ashley Offline
                                                    Ashley
                                                    Posts: 5,241
                                                    Ashley Offline
                                                    Ashley
                                                    wrote on last edited by
                                                    #13 Quote Reply

                                                      Put me in line for a farmer with scissors in red. :drool:

                                                      1 Reply Last reply
                                                      • Syph007 Offline
                                                        Syph007
                                                        Global Moderators
                                                        Posts: 9,842
                                                        Syph007 Offline
                                                        Syph007
                                                        Global Moderators
                                                        wrote on last edited by
                                                        #14 Quote Reply

                                                          @Ashley said:
                                                          Put me in line for a farmer with scissors in red. :drool:

                                                          hehe no problem, but I have to perfect my modding first. I'm a perfectionist and if something doesn't turn out just right it bugs me forever. So far so good though, I'm liking the threaded pivots, since the knife can then be serviced easy, even with locktite on the threads.

                                                          1 Reply Last reply
                                                          • bushidomosquito Offline
                                                            bushidomosquito
                                                            Posts: 660
                                                            bushidomosquito Offline
                                                            bushidomosquito
                                                            wrote on last edited by
                                                            #15 Quote Reply

                                                              If I may share what I've learned from playing with these pins, I think it's best for the pins to extend into the scales as far as they can. That way all the torque isn't put on those tiny screws. It also helps with assembly as the scales will snap into alignment and stay instead of you having to hold the springs compressed somehow while you get the last screw in place.

                                                              I've bought 100 of these screws,

                                                              http://www.usaknifemaker.com/index.php?main_page=product_info&cPath=30&products_id=118

                                                              and they fit the Alox scale holes perfectly sitting flush with the top of the scale so there's no need to re-sink them. If you put your pins in the collet of a Dremel tool you can spin the ends down and square with emery paper and even thread your screws into it and spin them while giving a light touch with fine emery papers to take out the machine marks. Some polishing compound after the 600 grit and,

                                                              they come out quite shiny.

                                                              1 Reply Last reply
                                                              • Syph007 Offline
                                                                Syph007
                                                                Global Moderators
                                                                Posts: 9,842
                                                                Syph007 Offline
                                                                Syph007
                                                                Global Moderators
                                                                wrote on last edited by
                                                                #16 Quote Reply

                                                                  @bushidomosquito said:
                                                                  If I may share what I've learned from playing with these pins, I think it's best for the pins to extend into the scales as far as they can. That way all the torque isn't put on those tiny screws. It also helps with assembly as the scales will snap into alignment and stay instead of you having to hold the springs compressed somehow while you get the last screw in place.

                                                                  I've bought 100 of these screws,

                                                                  http://www.usaknifemaker.com/index.php?main_page=product_info&cPath=30&products_id=118

                                                                  I'll have to try the screws you mentioned there, the ones I have a just a tiny bit on the small side, but very close.

                                                                  Im just realizing with my mockup I didnt get the pins into the scales very much at all, so Id redo them and make them a tad longer and stronger that way too, good tip for sure thanks!

                                                                  1 Reply Last reply
                                                                  • Syph007 Offline
                                                                    Syph007
                                                                    Global Moderators
                                                                    Posts: 9,842
                                                                    Syph007 Offline
                                                                    Syph007
                                                                    Global Moderators
                                                                    wrote on last edited by
                                                                    #17 Quote Reply

                                                                      Ok, I was excited to do a test fit together of all the parts. Some parts still need final sand and polish, but the major nicks are sanded out of the drilled holes.

                                                                      Starting from the back side scale with posts.

                                                                      Plus first layer...

                                                                      Plus scissors...

                                                                      Plus opener layer.. no saw layer on this first test mock up, didnt want to push my luck.

                                                                      Plus top scale!

                                                                      And some fully assembled shots...

                                                                      It's close to finished but a few details to tidy up. I still need to grind a little on the scissors back spring as well. I think I like the silver torx screws fine, I might try black to see how it compares.

                                                                      Cheers!

                                                                      1 Reply Last reply
                                                                      • bushidomosquito Offline
                                                                        bushidomosquito
                                                                        Posts: 660
                                                                        bushidomosquito Offline
                                                                        bushidomosquito
                                                                        wrote on last edited by
                                                                        #18 Quote Reply

                                                                          :tu:
                                                                          Isn't it awesome to just screw them together knowing that you can pop them right apart again if something needs adjusted?

                                                                          1 Reply Last reply
                                                                          • Syph007 Offline
                                                                            Syph007
                                                                            Global Moderators
                                                                            Posts: 9,842
                                                                            Syph007 Offline
                                                                            Syph007
                                                                            Global Moderators
                                                                            wrote on last edited by
                                                                            #19 Quote Reply

                                                                              @bushidomosquito said:
                                                                              :tu:
                                                                              Isn't it awesome to just screw them together knowing that you can pop them right apart again if something needs adjusted?

                                                                              OMG yes! I didn't have any problems drilling out the springs or parts to 1/8 inch. The tool components for alox SAKS start at 3mm anyhow, so not much material to remove. Small price to pay for easy assembly and servicing!

                                                                              The only thing I'm wishing is for some screws that looked more like rivets. Maybe the button heads would look better. I could hit the alox scales with a milling bit to square the hole bottoms... hmmm

                                                                              1 Reply Last reply
                                                                              • MadPlumbarian Offline
                                                                                MadPlumbarian
                                                                                Posts: 38,623
                                                                                MadPlumbarian Offline
                                                                                MadPlumbarian
                                                                                wrote on last edited by
                                                                                #20 Quote Reply

                                                                                  Great job Syph007,, very nice on the torx part!! JR

                                                                                  1 Reply Last reply

                                                                                  Hello! It looks like you're interested in this conversation, but you don't have an account yet.

                                                                                  Getting fed up of having to scroll through the same posts each visit? When you register for an account, you'll always come back to exactly where you were before, and choose to be notified of new replies (either via email, or push notification). You'll also be able to save bookmarks and upvote posts to show your appreciation to other community members.

                                                                                  With your input, this post could be even better 💗

                                                                                  Register Login


                                                                                  • 1
                                                                                  • 2
                                                                                  • 3
                                                                                  • 4
                                                                                  • 5
                                                                                  • 301
                                                                                  • 302
                                                                                  1. Home
                                                                                  2. Tool Talk
                                                                                  3. The Mod Squad
                                                                                  4. And so it begins.... (My adventures into Alox!)
                                                                                  Reply
                                                                                  • Reply as topic
                                                                                  Log in to reply
                                                                                  COMMUNITY LINKS
                                                                                  EDC-TV SAKWiki GearFeed SAKSelector
                                                                                  Operational Funds

                                                                                  Help us keep the Unworkable working!

                                                                                  Make A Donation
                                                                                  November Goal: $300.00
                                                                                  Due Date: Nov 30
                                                                                  Total Receipts: $0.00
                                                                                  Below Goal: $300.00
                                                                                  0% funded
                                                                                  • Login

                                                                                  • Don't have an account? Register

                                                                                  • Login or register to search.
                                                                                  • First post
                                                                                    Last post
                                                                                  0