How to build a modern golfer (84mm cellidor)
-
-
Luckily the hole in the old backspring is already the correct size, so we do not need to alter that at all. I use a dremel with a cutoff disc to chop off the head of this spring and then grind it down so that it is flat and you end up with a straight edge more or less.
So now we have a scissors rest, and chopped down spring.

Now for the tricky and fiddly part of mating these two pieces to yield a spring that fits just right and has the right amount of snap.
I'm using cadet scales for fit up tests here, but only because they were handy. Using cellidor liners is just as good. Here you can see a rough fit up of the parts we just made, and how much correction we need to do.

The first adjustment is to grind the bottom of the rest which will set how high the spring end sits in the right of the above picture. If the spring end is too high it will be impossible to assemble and snap will be too much. If the spring end is too low, the scissors will have poor snap. I try to get the spring end to just about equidistant between the hole and edge of the scale as shown above.
Once we have the spring end set, that takes care of the functional adjustment, the rest of the adjustments are for fit and esthetics.
If you turn your attention to the bottom of the spring now, you can see there is overlap with the scale, and of course it is also too long.


Again I use a sharpie to mark the overlap.

Then I go back to the grinder to remove the marked area, which leaves us now with a spring and spring rest just right for an 84mm.

Next we need to modify the 91mm scissors.

-
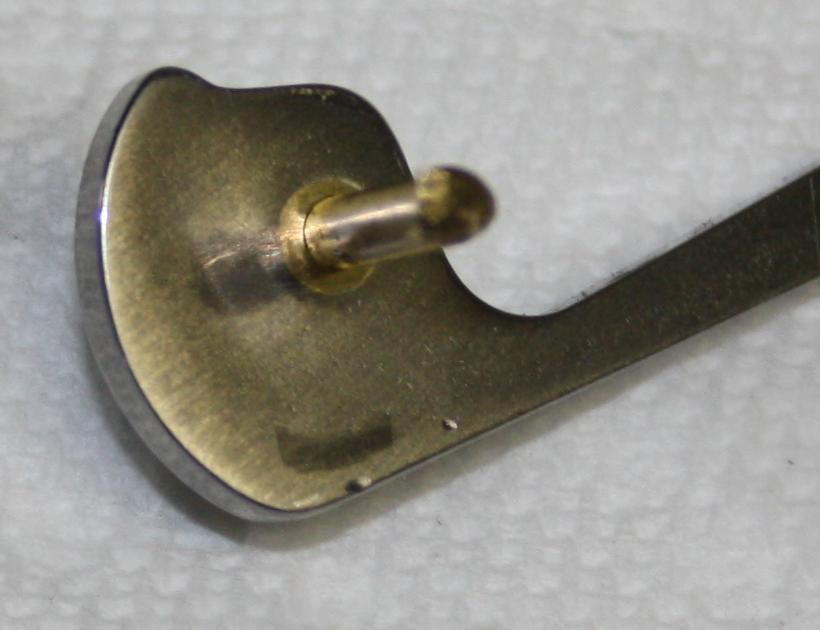
Now if I had a 2.2 carbide bit I could just drill a hole right where I need in the scissors, but I do not, so I do the same trick as before and drill a 1/8 hole, beat some brass into it and sand flush.

And again use a 2.2 mm drill bit to make a proper size pivot hole for the brass rod.

Next alot of grinding needs to be done on the scissors. No need to mark anything at this point, as its mostly grind and test fit, then repeat until just right.
This is how they end up looking. There are 3 areas that need attention.

Firstly shorten the hump of the pivot as close to the old pivot hole as possible. I prefer to keep it more squarish (but just a bit) than I ended up doing here, but this worked fine too.
Second the notch that engages the backspring end needs to me moved a good quarter inch or more. I usually just grind it back a bit, then test fit and grind some more.
Third the scissor handle need to be shortened. Just a bit though, take off a few mm at first (do you love how I mix up metric and imperial units
 ) then test fit and adjust.
Here is what they look like with the pivot hump adjusted and backspring notch ground correctly.

And here is a test fit up with both scales separated so you can see how the scissors are behaving on close. This is how I adjust the scissor handle length until the scissor tips just hit the rest we made.

In the picture above the scissors do not quite hit the rest so the handle needs to be shortened just a bit more.
See why I said this part was fiddly? Lots of test fitting to get everything just right, but this is the bulk of the work for the mod, and now we made an 84mm scissors layer from 91mm parts!

More postings after dinner...
-
Excellent stuff so far

-
So with the scissor modding done, we can assemble now. Here are all the parts going to go together.

The stock aluminum liners are pretty crumby, but I edge sanded and polished them anyway. At least they dont look as rough as they did.
A closeup of the scissor parts. Note this is a second pair after the one I started with, and I used nickel silver as a bushing in this set.

And now we start building... nothing special here, just normal SAK assembly. I do like to leave the pins long, much easier to build that way I think.


And then peened... Note I am sitll not an expert peener, but since plastic scales go over top, noone is any the wiser...

-
Just pop the scales back on and there we have it... an 84mm golfer made with all current parts!
I love these things and I see why they were a popular SAK when they were being made.


Here is the golfer posed with it's bigger brother the 91mm compact.

This was a fun little mod, and next I think will be an 84mm super tinker.
Cheers
-
-
That's an excellent how to and a great mod. I'll sticky it for refernce later but after people see it cause as we all know, nobody reads the stickies.
 Great job there. Thanks!

-
Very cool. Love the ingenuity.
-
Brilliant! Thanks for putting this up - really clear steps and pics. Thanks for taking the time.
-
Thanks all! I've been meaning to document the scissors mod for 84s for awhile, so it seemed like a good opportunity since I wanted to make a golfer anyhow. I wrecked many sets of scissors experimenting, so I thought if I showed how I do it now, that it might save others the aggravation.
These scales have the pin hole and I can add the corkscrew driver, making it only lack the pen of its big brother compact. I really like the little 84 size and it is sad that Vic stopped making scissors for them.
Cheers
-
-
When I say grind, I mean my bench belt sander. It takes off metal very fast and it's just a cheap $80 one that uses a 1x30 belt. For example to remove the metal for the pivot reshaping takes less than a minute.
Mine looks similar to this.
-
-
@hiljentaa said:
Nice! You should do an Apprentice like this. I can't seem to find one anywhere...Ah the apprentice would be a quick build as its basically a waiter with the phillips instead of corkscrew. So you can just buy a waiter and swap in the phillips. The back phillips and corkscrews are identical between the 84 and 91 size.
-
Nice! You should do an Apprentice like this. I can't seem to find one anywhere...
Ah the apprentice would be a quick build as its basically a waiter with the phillips instead of corkscrew. So you can just buy a waiter and swap in the phillips. The back phillips and corkscrews are identical between the 84 and 91 size.
TIL. Thanks! I'll put that on the 'to-do' list.
there's even a "how-to" thread for Phillips/corkscrew; </post/166447>
-
Outstanding job Syph - thanks for the great walk through
-
Nice! You should do an Apprentice like this. I can't seem to find one anywhere...
Ah the apprentice would be a quick build as its basically a waiter with the phillips instead of corkscrew. So you can just buy a waiter and swap in the phillips. The back phillips and corkscrews are identical between the 84 and 91 size.
TIL. Thanks! I'll put that on the 'to-do' list.
there's even a "how-to" thread for Phillips/corkscrew; </post/166447>

Endless amounts of excellent information here! Thanks.
-
@Syph007 said:
Ok this is how I make my backsprings. The modern backspring will become the scissor rest and the older backspring will become the body of the spring.Now... since the stock hole in the modern rest is 2.5mm and I want it to be 2.2mm for an 84mm mod, what do we do?
We use a bushing! Now since the difference between 2.5 and 2.2 mm is not very much material for a bushing, I started by drilling out the hole to 1/8 inch since thats the size of carbide bit I had handy. The size isnt important at all, as long as its bigger.
Then take a small piece of brass (or nickel silver) and beat it into the hole, hit it hard on both sides so it is good and stuck into the hole. Then cut the excess off each side and sand flat and you end up with this.

I only have non carbide 2.2 mm drill bits, but since we are now drilling through soft brass it's no big deal, so center punch to mark and drill away. It isnt even critical at this stage to get it dead center as you will see later on.

And test to make sure the 2.2mm brass stock fits, and we have successfully reduced the hole size to what we need.

Love to have a go at this but just wondering if it is easily achievable just using the old style scissor spring? I do have both available but would rather keep the newer one for another build if possible. I do have two old ones though if that could work too?



Hello! It looks like you're interested in this conversation, but you don't have an account yet.
Getting fed up of having to scroll through the same posts each visit? When you register for an account, you'll always come back to exactly where you were before, and choose to be notified of new replies (either via email, or push notification). You'll also be able to save bookmarks and upvote posts to show your appreciation to other community members.
With your input, this post could be even better 💗
Register Login