
Shop projects
-
Cool

You should have no prob, there just such fun
JR -
Don't really have a shop, but the misc. tools I clamp to an old garden table today tackled shell casings to make lanyard beads. I had no idea how thick the end of a bullet casing was...


-
I just set up a ship in my cellar with the tools I inherited from my father in law. It's slowly coming together. He was a big gadget freak and a big time Leatherman fan.
-
@Barry Rowland said:
I just set up a ship in my cellar with the tools I inherited from my father in law. It's slowly coming together. He was a big gadget freak and a big time Leatherman fan.The ship/shop typo gave me a laugh. Thanks! Unless you are setting up a ship in your cellar?
Tools with a history are always nice. I have most of my father's power tools.
-
I’m just working on one of my models on my homemade workshop bench/table so I can sit in my recliner,
JR
-
@MadPlumbarian said:
I’m just working on one of my models on my homemade workshop bench/table so I can sit in my recliner,
JRThat's the way to do it!! At the moment I'll settle with my foldable seat!! :D
-
@WWW said:
That's the way to do it!! At the moment I'll settle with my foldable seat!! :DI was looking for a lap table and they were a fortune, and to top it off very small, so I bought a nice piece of wood, cut it to fit perfect, then stained it, the came up with an idea after i worked on a model, the models I work on are all metal, and all the pieces come in a few flat pads (you got to cut them out and form them) and since the recliners a little pitched, I used the router and plunged four holes from the bottom, dropped in a magnet in each, then used hot glue to fill each one, and since the model pieces are very small I ran a piece of paracord around the bottom so if anything slides it catches, all for cheap rather then expensive, plus ever so comfortable sitting in the recliner! Just put the tools off to the side! Here’s a few pics,,
JR


-
-
@MadPlumbarian said:
I was looking for a lap table and they were a fortune, and to top it off very small, so I bought a nice piece of wood, cut it to fit perfect, then stained it, the came up with an idea after i worked on a model, the models I work on are all metal, and all the pieces come in a few flat pads (you got to cut them out and form them) and since the recliners a little pitched, I used the router and plunged four holes from the bottom, dropped in a magnet in each, then used hot glue to fill each one, and since the model pieces are very small I ran a piece of paracord around the bottom so if anything slides it catches, all for cheap rather then expensive, plus ever so comfortable sitting in the recliner! Just put the tools off to the side! Here’s a few pics,,
JRNiice!! Using the magnets was a clever idea, it must feel great and really comfortable!!
-
-
After watching countless hours of putty knife restorations, I was ready to restore one myself. But after seeing the ridiculous shipping prices on eBay I decided that I would have to buy localy. It was settled, localy it was. But the putty knives I'd found were in no need of TLC. They were NOS (New Old Stock), and were a better buy than older beat up ones. In that moment I realised that I could make one myself!! But as usual it took me ages to gather the willingness to produce one. After watching a rehandling by YouTuber 357magdad, I knew that I could not waste more time. And so this journey began...
Reclaimed wood from a "cake stand" (no idea what they're called), parts were filled with bugs, used my Stanley nº4 to taper and clean up the sides. The tenon was cut with a chisel to fit a 15mm copper connector that was cut in half.
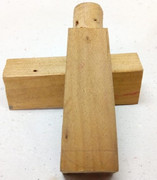
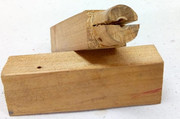
A better look at the tenon. A hole was drilled and a slot was cut with a hacksaw. The slot is then carved into the handle with a modified hacksaw blade.
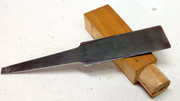
An old saw blade is cut and shaped to form the blade of the putty knife. Later decided to add the taper you see marked with a sharpie marker.
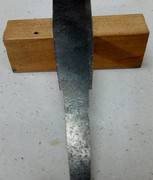
Decided against the round shoulders and went for straight 90º. The tang was also filed a little more, enlarging the slot was more difficult than making the tang narrower.
Finished product with the copper "ferrule" in place. I reckon that I could use a reduction to get a little bit of a radius on the top of the ferrule.

Backside of the handle. I did not apply any finish as I may change my mind regarding the handle shape.

Sorry for the bad photos and the unnecessarily long windedness!
-
Nice project and well done !
-
This would be a fun project
- YouTube
Auf YouTube findest du die angesagtesten Videos und Tracks. Außerdem kannst du eigene Inhalte hochladen und mit Freunden oder gleich der ganzen Welt teilen.

(www.youtube.com)
-
@SteveC said:
This would be a fun project- YouTube
Auf YouTube findest du die angesagtesten Videos und Tracks. Außerdem kannst du eigene Inhalte hochladen und mit Freunden oder gleich der ganzen Welt teilen.
(www.youtube.com)
Pretty cool. Btw hello Steve

Although I would not have made it a flat bottom boat. -
@tattoosteve99 said:
Pretty cool. Btw hello Steve
Although I would not have made it a flat bottom boat.
-
@tattoosteve99 said:
Although I would not have made it a flat bottom boat.Flat-bottom hulls, they make the rockin' boats go 'round...
::)
-
Due to some unfortunate purchasing of a TV walls setup we ended up with on made for buildings with a smaller distance between the joist in the wall. Thus it needs to be fastened to something than spans wide enough to hang it up. I thought that would be a nice little project to test a new toy I got some time ago on sale, and maybe add some pictures here in the process.
So I started with a leftover piece of 3mm steel sheet that happened to be suitable wide but too long. So it had to be cut, and I get to try my new toy.
-
So the new little toy is a, eh, something, that mounts on the angle grinder. It serves three purposes - gather dust via the vacuum coupling, having a straight edge to follow for straight cuts, and a cut depth setting. I try to avoid doing much inside that spreads dust in general, and metal dust in particular, so this is a nice little addition. It worked very well - very little escaped from that test cut.
-
After that I got to try another new addition, a small 125mm angle grinder, to just clean up all the edges and round the corners. Note the narrow grip compared to the other angle grinder - this one is very easy to grip.
-
The old steel sheet had a lot of character and rusty patina. It is to be spray painted later so at least the rust have to go. Some steel brushing does that just fine.
-
This needs to hang on the wall so some holes will be needed. Some marking tools are good to locate those.


-










Hello! It looks like you're interested in this conversation, but you don't have an account yet.
Getting fed up of having to scroll through the same posts each visit? When you register for an account, you'll always come back to exactly where you were before, and choose to be notified of new replies (either via email, or push notification). You'll also be able to save bookmarks and upvote posts to show your appreciation to other community members.
With your input, this post could be even better 💗
Register Login


