
3D Printer Blog
-
No. I don't want any toxic fumes in my living room. I thought the enclosure might help with temperature settings and to keep the dust off of the printer.
Ok. I just had an ah ha moment with CURA. I did not know that if I clicked on the advanced tab, I have a whole lot of options. I played around with the infill settings and figured out that I don't have to stick with 60% infill. For some unknown reason, when I slice a model, I still cannot preview it. If I can see what the support looked like, I could have said hell no to this mornings fan guard disaster, or the figurine I printed yesterday.
Me thinks I should try to find an instruction manual for CURA 4.6, or at least look at some instructional videos.
Update on the fan guard...although it is a thing of beauty I cannot remove all that inside plastic. So I found a different model and am printing that with no support to see what that might turn out like.
-
I think I will eventually print something out to store the tools. So far this is my starter kit.
<a href="https://flic.kr/p/2j34Y9q" target="_blank" rel="noopener noreferrer"><img src="https://live.staticflickr.com/65535/49906521568_ea8bf00b3d_k.jpg" alt="banner" style="max-width: 100%; height: auto;" /></a>IMG_8463A by Chako, on Flickr
Here is the finished product I printed earlier. I struggled to clean the inside of that fan guard to no avail. It is unsalvageable as mentioned above. Too bad as it came out great. I am learning by trial and error the does and don'ts of support. CURA is one tricky program.
<a href="https://flic.kr/p/2j34Y8P" target="_blank" rel="noopener noreferrer"><img src="https://live.staticflickr.com/65535/49906521533_ddda32f527_k.jpg" alt="banner" style="max-width: 100%; height: auto;" /></a>IMG_8466A by Chako, on Flickr
On the plus side, everything else came out good. I stored the little c clips away (always good to have more of those for the boden tube). I did manage to use the filament guide and the LCD cable clips to good use.
Here you can see the filament guide. In case you are wondering, my LED light is a Phillips Light Flute held there by its magnetic base.
<a href="https://flic.kr/p/2j39abX" target="_blank" rel="noopener noreferrer"><img src="https://live.staticflickr.com/65535/49907339167_201fd79422_k.jpg" alt="banner" style="max-width: 100%; height: auto;" /></a>IMG_8467A by Chako, on Flickr
And the LCD cable clips in use.
<a href="https://flic.kr/p/2j34Y69" target="_blank" rel="noopener noreferrer"><img src="https://live.staticflickr.com/65535/49906521378_167d25c086_k.jpg" alt="banner" style="max-width: 100%; height: auto;" /></a>IMG_8469A by Chako, on Flickr
-
Now I know the difference between a raft, a brim, and a skirt. :think:

Raft vs Brim vs Skirt: The Differences (incl. Cura settings)
3D printing raft vs. brim vs. skirt: Learn the differences between these adhesion assistants and which to choose, using Cura as an example.

All3DP (all3dp.com)
-
Ok...well that turned out very well without supports. Now my main board cooling fan is protected from any plastics raining down on it.
<a href="https://flic.kr/p/2j36frt" target="_blank" rel="noopener noreferrer"><img src="https://live.staticflickr.com/65535/49906771493_f8e94fb9bd_k.jpg" alt="banner" style="max-width: 100%; height: auto;" /></a>IMG_8474A by Chako, on Flickr
And I also printed this file at the same time. This little plastic bit that slides onto the metal plate will ensure that my filament will not be rubbing against the Z axis screw which is full of lubricant. I gather lubricant and filament are not a good mix.
<a href="https://flic.kr/p/2j38TVW" target="_blank" rel="noopener noreferrer"><img src="https://live.staticflickr.com/65535/49907287836_0e7839f489_k.jpg" alt="banner" style="max-width: 100%; height: auto;" /></a>IMG_8475A by Chako, on Flickr
The upgrade of my machine is well under way with all these little enhancements.
-
Nice! I think 3D printers are a first step to self-replicating Von Neumann machines (just need to add enough brains to form initiative haha).

-
@Dutch_Tooler said:
Nice! I think 3D printers are a first step to self-replicating Von Neumann machines (just need to add enough brains to form initiative haha).
Unfortunately, they currently are relying on the PEBKAC.
-
Any system is only as good as its weakest link.

Ok, this fine morning, I am printing a Yoda extruder knob. For the first time, I am looking at adding a raft and a different type of support...one that only builds a tower to support overhangs as opposed to supporting everything everywhere,
Trial and error continues, possibly with a lot of PEBKAC in the process. :ahhh
EDIT: I can tell from my initial raft layers that my right side of the bed is slightly out of level. I should probably halt everything, level the bed, and restart, but because I am experimenting with a raft, I am curious to see how this will turn out. So the experiment continues.
-
Ok..so this was the result.
<a href="https://flic.kr/p/2j3esKW" target="_blank" rel="noopener noreferrer"><img src="https://live.staticflickr.com/65535/49908373828_f8364938c5_k.jpg" alt="banner" style="max-width: 100%; height: auto;" /></a>IMG_8477A by Chako, on Flickr
I think this part may need some painting down the road.
<a href="https://flic.kr/p/2j3iDhJ" target="_blank" rel="noopener noreferrer"><img src="https://live.staticflickr.com/65535/49909189702_4757d29c9d_k.jpg" alt="banner" style="max-width: 100%; height: auto;" /></a>IMG_8478A by Chako, on Flickr
-
red is horrible for photography.
Concert pics with red lights

seems you defeated the pebkac this time in spite of the levelling issue?
-
It seem like you are off to a good start.
There are reference models available that tests various characteristics of your printer and material so it will be easier to find good settings, limits and orientation for parts and supports. (Typically some parts with various degrees of overhang, bridges, details and so on).
-
No, there are models that are made specifically to have more gradual and systematic reference tests of common key points.
This test of some filament has one such model for instance (there are many):
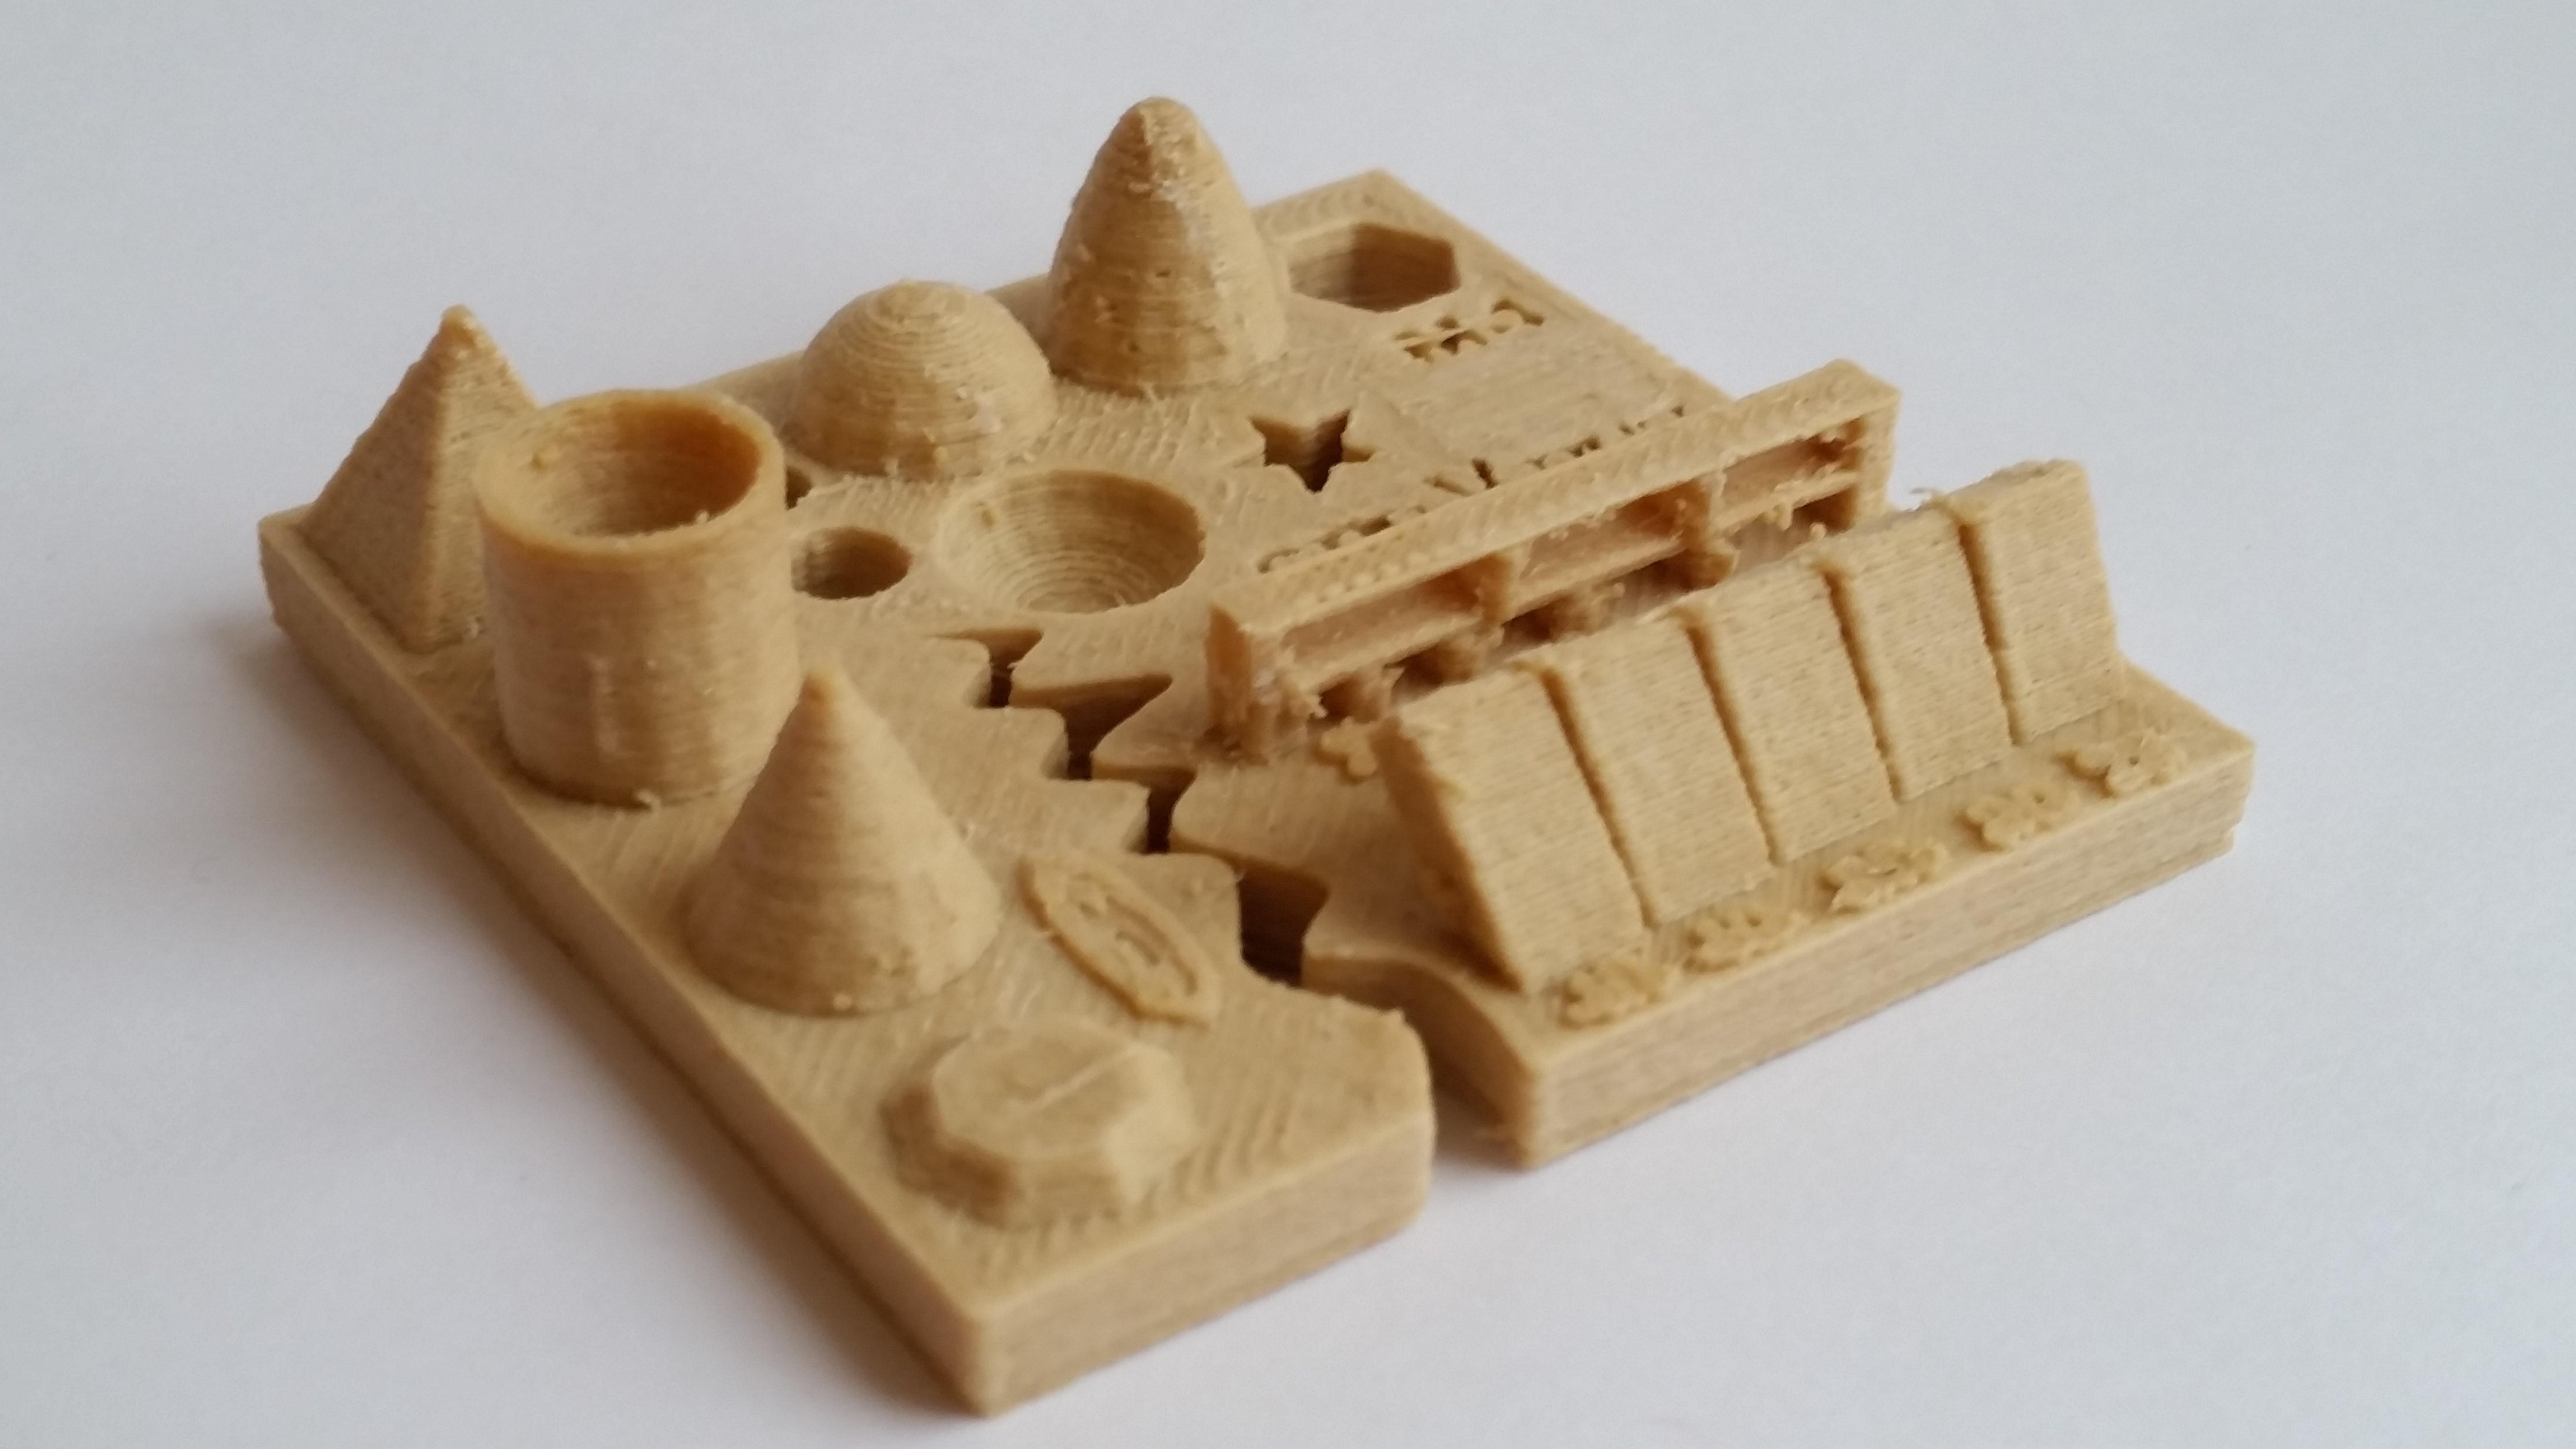
You might want such a reference model that you can use as a consistent reference when you try out different materials and settings. A model with overhangs, bridges, thin bosses, holes in different sizes and directions, round parts.. I'm sure someone will have cooked up a fairly complete model by now?
Edit: This video seem to give some general ideas: https://www.youtube.com/watch?v=kgCjDy_IgXg (I didn't watch through all of it).
-
Oh I see. I will look into that further. So far, I cannot complain with the results I am getting. After doing a lot of reading, I knew there was a steep learning curve. What I didn't know was that most of it was going to be with the software.
Just finished printing another part to improve the printer. Not sure if this popular print is there to make the power supply fan quieter, or just for looks...but either way, I must admit is does look a lot nicer than a simple hole in the power supply. I even printed off the embossed version much like the much more needed control box cooling fan guard. I run a sharpie on the raised edges to pull out the details.
Yesterdays part with a bit of sharpie applied. This part is much needed to prevent plastic bits from entering and possibly damaging the mother board and the fan. Printed nicely with no supports, and only the obligatory skirt. I noticed that during my few days of use, the bed itself got out of level. The skirt...which is only a thin line that goes around the project, looked very thin on the right hand side. I was able to print this part as well as a extruder knob with no issues. However, I did not it was harder to remove the part from the glass bed. I learned something there. If the space is too close between the nozzle and the bed, it will be a lot harder to remove the part from the printing bed.
<a href="https://flic.kr/p/2j3rGnw" target="_blank" rel="noopener noreferrer"><img src="https://live.staticflickr.com/65535/49910760968_561a044a87_k.jpg" alt="banner" style="max-width: 100%; height: auto;" /></a>IMG_8480A by Chako, on Flickr
Today's print with a few minutes to level the bed beforehand. I found it a lot easier this time to level the bed. Once again, I used no supports other than a skirt. This time around, the skirt looked really good. I fell asleep watching TV in the same room as the printer. When I woke, the bed and nozzle had already cooled down and all was finished. The part simply popped right off the glass bed. Another lesson there. I should wait for the bed to cool down before removing a part, as it should come off easier. Patience is a virtue. Here is the power supply fan silencer installed and sharpied.
<a href="https://flic.kr/p/2j3rGm4" target="_blank" rel="noopener noreferrer"><img src="https://live.staticflickr.com/65535/49910760883_aded56f067_k.jpg" alt="banner" style="max-width: 100%; height: auto;" /></a>IMG_8481A by Chako, on Flickr
I am also learning just how much filament there is on a 1Kg spool, and just how many projects you can do with that much.
-
In the process of printing a storage drawer designed to fit the front empty space on the right between the LCD panel and the Y axis arm.
<a href="https://flic.kr/p/2j3DFHf" target="_blank" rel="noopener noreferrer"><img src="https://live.staticflickr.com/65535/49913100092_df54ac29ec_k.jpg" alt="banner" style="max-width: 100%; height: auto;" /></a>IMG_8482A by Chako, on Flickr
<a href="https://flic.kr/p/2j3CadP" target="_blank" rel="noopener noreferrer"><img src="https://live.staticflickr.com/65535/49912802411_be105ccb8e_k.jpg" alt="banner" style="max-width: 100%; height: auto;" /></a>IMG_8483A by Chako, on Flickr
My original plan was to do all the printer upgrades in black, and to learn with the red filament and to create my computer parts using it as my computer case is red. I ordered 2 black PLA 1Kg rolls of filament from Amazon, which was supposed to be in last Friday. Of course nothing is on time anymore because of COVID 19 and the probably big hit from everyone buying online these days. I will say, black and red for a 3D printer is a flashy combo, albeit not planned.
I had wanted a 3D printer for about 10 years now...and kept putting it off till prices went down, and the tech matured. I also wondered what I could possibly want to print or to put a 3D printer to use. Well now that I have one, the possibilities are limitless. I can even create simple parts from scratch using TinkerCad. Mind officially blown!
-
The print just finished, and it was a success. This will give me some much needed storage space and it is locked into the printer and slides in and out for ease of access.
<a href="https://flic.kr/p/2j3ETgU" target="_blank" rel="noopener noreferrer"><img src="https://live.staticflickr.com/65535/49913334102_9216982331_k.jpg" alt="banner" style="max-width: 100%; height: auto;" /></a>IMG_8487A by Chako, on Flickr
<a href="https://flic.kr/p/2j3Dn8U" target="_blank" rel="noopener noreferrer"><img src="https://live.staticflickr.com/65535/49913037606_2a350b124e_k.jpg" alt="banner" style="max-width: 100%; height: auto;" /></a>IMG_8486A by Chako, on Flickr
All that I think I need to do is to print out a tool holder that will hang off the gantry and I think I have the printer where I need it for now. I will print an LCD back protective cover once I get the BigTreeTech motherboard, then I can install the newer LCD that I already have...seeing that it has a USB and a SD card slot on the right hand side...which will be a big upgrade compared to the awkwardly placed micro SD card on the front.
-
Here is the tool holder. Lots of designs out there, but to me, placing it on the gantry is the best place. Surprisingly enough, the printer came with a pair of screws and anchors that were not required in the build...and this tool holder puts them to good use.
<a href="https://flic.kr/p/2j3MiS9" target="_blank" rel="noopener noreferrer"><img src="https://live.staticflickr.com/65535/49914587496_f084395250_k.jpg" alt="banner" style="max-width: 100%; height: auto;" /></a>IMG_8491A by Chako, on Flickr
Room for a few extra drivers, etc.
<a href="https://flic.kr/p/2j3JLAT" target="_blank" rel="noopener noreferrer"><img src="https://live.staticflickr.com/65535/49914092103_62283d11d9_k.jpg" alt="banner" style="max-width: 100%; height: auto;" /></a>IMG_8488A by Chako, on Flickr



Hello! It looks like you're interested in this conversation, but you don't have an account yet.
Getting fed up of having to scroll through the same posts each visit? When you register for an account, you'll always come back to exactly where you were before, and choose to be notified of new replies (either via email, or push notification). You'll also be able to save bookmarks and upvote posts to show your appreciation to other community members.
With your input, this post could be even better 💗
Register Login





